notice in some of the stills that all the colors are quite dark and hard to pick out which color is which.
Dan
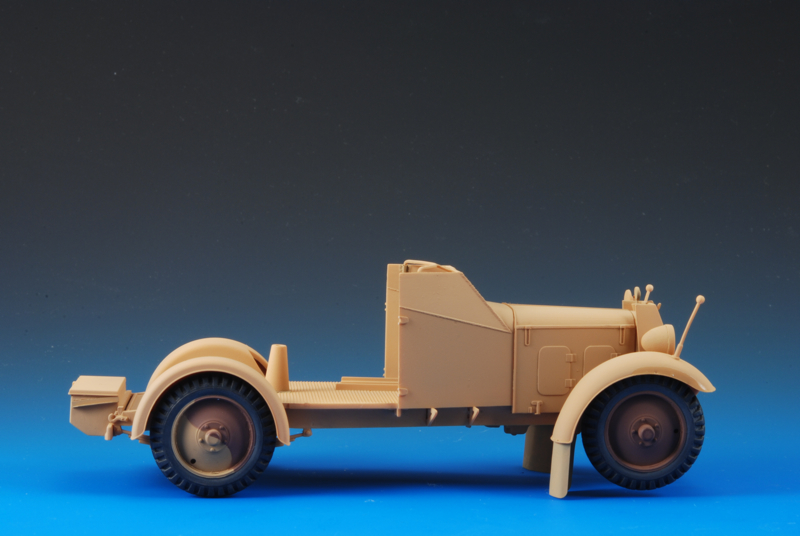
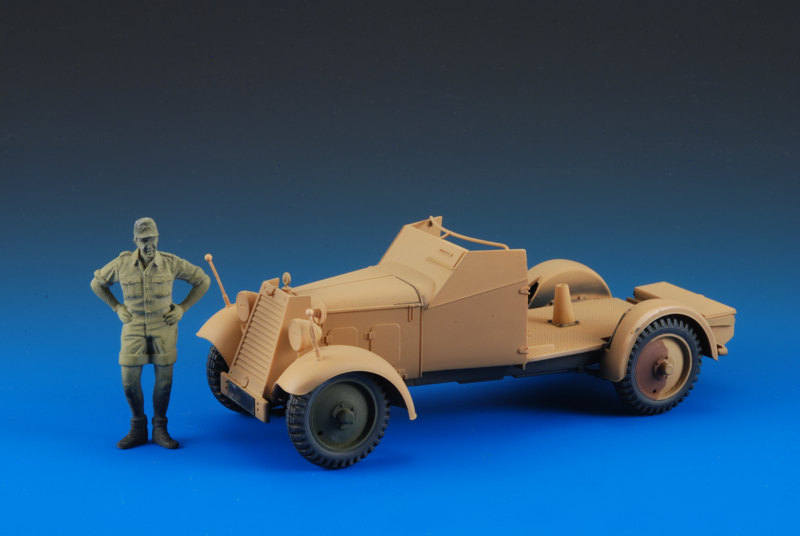
Adler Kfz. 13 ~ Bronco Models
Re: Adler Kfz. 13 ~ Bronco Models
![]() by Dan Reed » Fri Sep 17, 2010 5:50 am
by Dan Reed » Fri Sep 17, 2010 5:50 am
- Dan Reed
- Posts: 271
- Joined: Sun Dec 20, 2009 10:54 pm
- Location: Buffalo, MN
Re: Adler Kfz. 13 ~ Bronco Models
![]() by Jamie Tainton » Mon Sep 27, 2010 2:33 pm
by Jamie Tainton » Mon Sep 27, 2010 2:33 pm
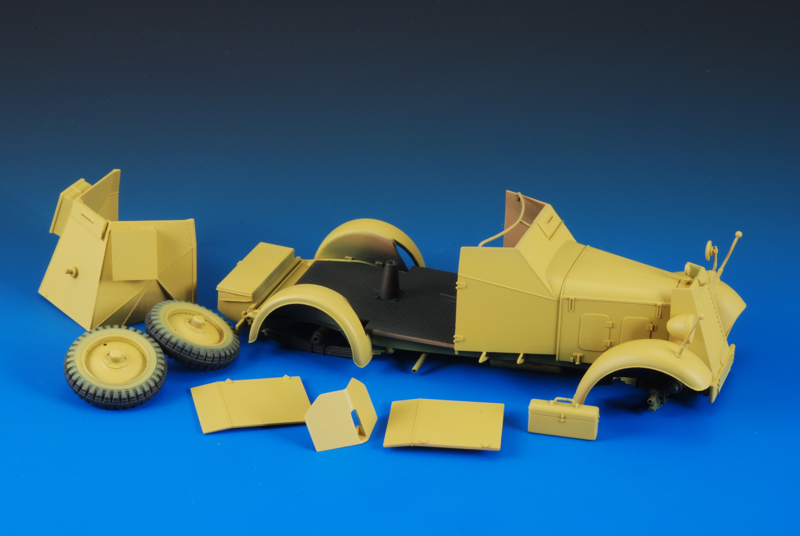
Even though I kinda messed up in the painting so far, having to strip it all back to the bare plastic has allowed me to fix some of the issues that were bothering me with the build but couldn't address since the building was "done".
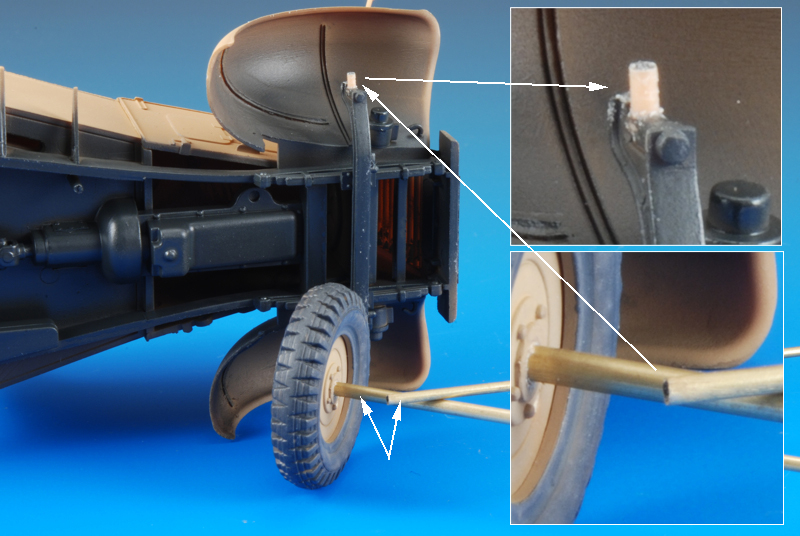
One area was the support for the seat and gun that goes on the pedestal. I really thought the Bronco design was weak here and decided to use some bras rod to allow more strength and flexibility in placement of the rig. To tell you the truth, while Bronco does need to be credited for bringing some cool and interesting subjects to market- their engineering and ideas on how these kits go together, needs some work
Here is a shot of the refurbished support.
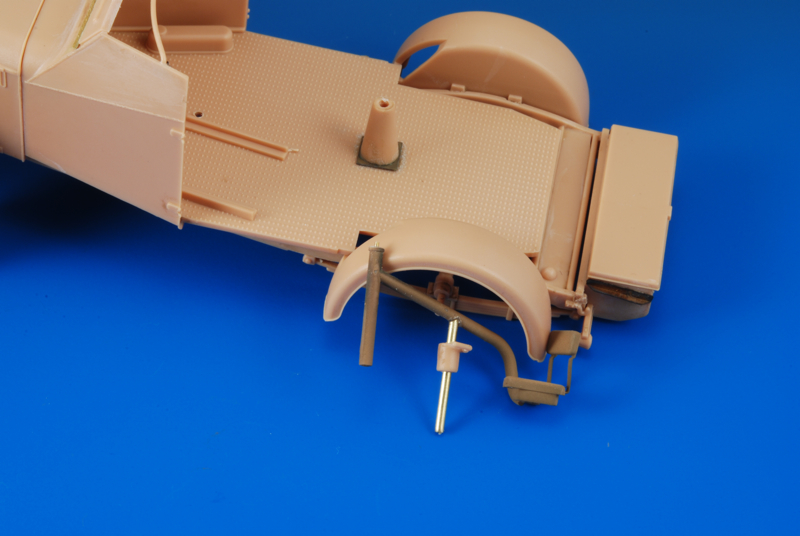
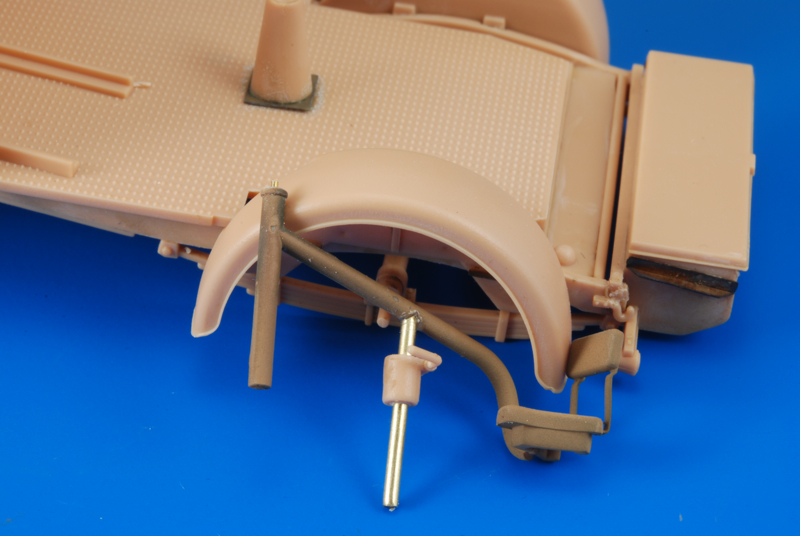
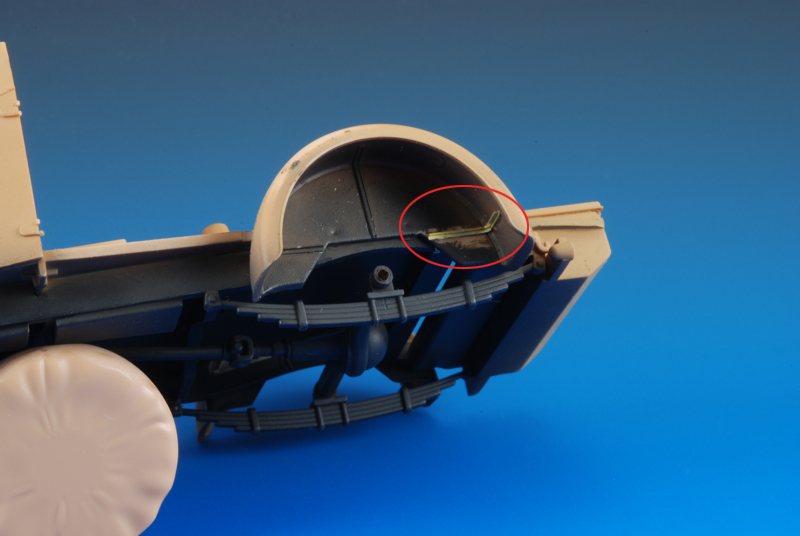
In place, and here you can see I've added a little pintle of brass rod where the gun shield sits.
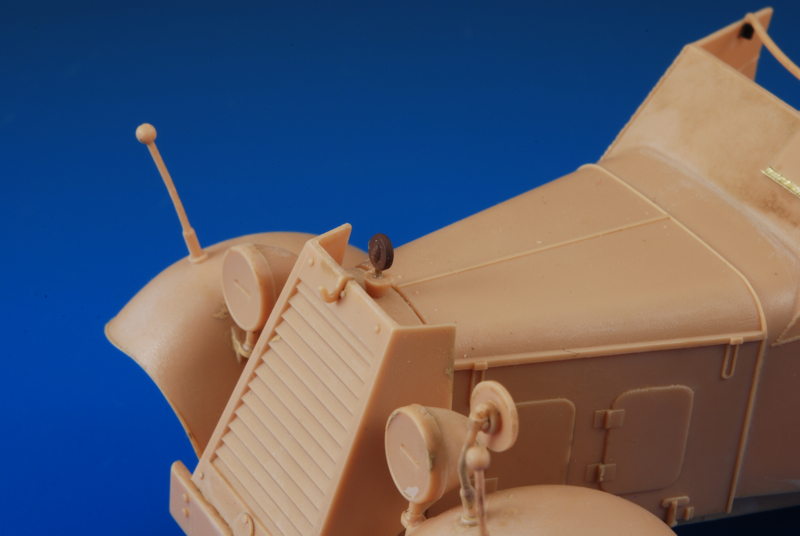
The hood ornament also received some love in the form of a tiny piece of brass rod to pin the thing to the hood more securely.
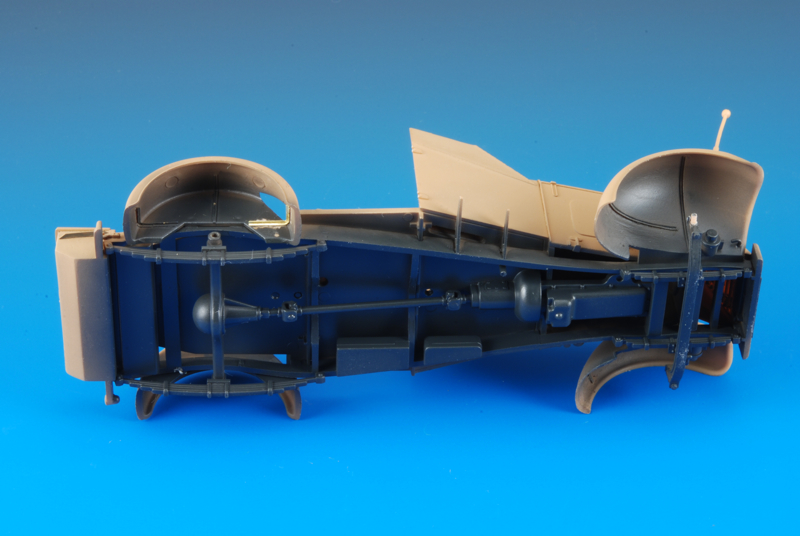
A weak area in Bronco's engineering seems to be the fit of things like the hole in the wheels and the pin on the rear end axle. It is far from a good fit and is very loose. This is something that I will address again with some brass rod. I'll cut the plastic pin of the axle and then drill a hole into which the wheel and appropriately sized piece of brass rod will insert.
The front axle is weak in fit and design as well, not much for the wheel to hold onto there!
Also, an on going pain in the fucking ass, is the retarded method and part/fit of the front mud flaps!
As you can see here if you glue them where it seems they want you to (according to the rivets on the back of the fenders and the rivets on the PE parts) the front wheels won't touch the ground. Christ!, I have wasted so much time on these fucking things. All I can say is wait till every thing else is done- then add them- I think I will be scratching some too!
Everything is now coated in the yellow colour. (BTW I have since ripped the flaps off and sanded the plastic of any remnant CA glue)
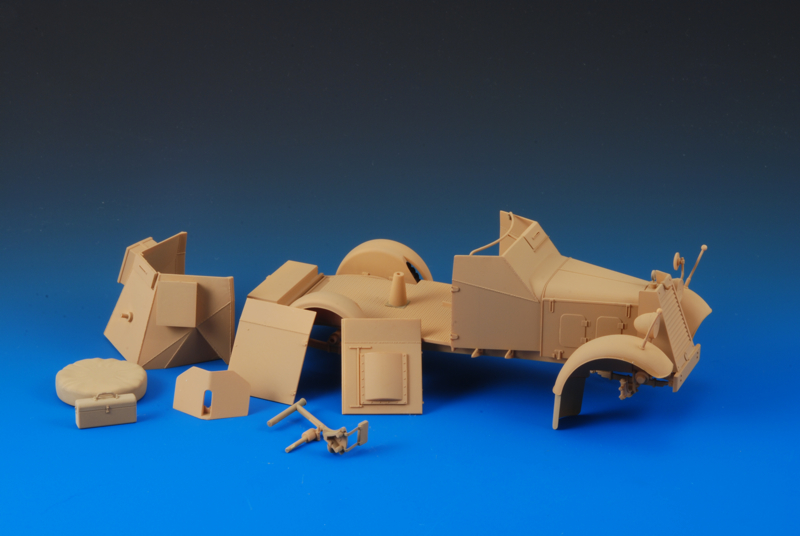
One area was the support for the seat and gun that goes on the pedestal. I really thought the Bronco design was weak here and decided to use some bras rod to allow more strength and flexibility in placement of the rig. To tell you the truth, while Bronco does need to be credited for bringing some cool and interesting subjects to market- their engineering and ideas on how these kits go together, needs some work
Here is a shot of the refurbished support.
In place, and here you can see I've added a little pintle of brass rod where the gun shield sits.
The hood ornament also received some love in the form of a tiny piece of brass rod to pin the thing to the hood more securely.
A weak area in Bronco's engineering seems to be the fit of things like the hole in the wheels and the pin on the rear end axle. It is far from a good fit and is very loose. This is something that I will address again with some brass rod. I'll cut the plastic pin of the axle and then drill a hole into which the wheel and appropriately sized piece of brass rod will insert.
The front axle is weak in fit and design as well, not much for the wheel to hold onto there!
Also, an on going pain in the fucking ass, is the retarded method and part/fit of the front mud flaps!
As you can see here if you glue them where it seems they want you to (according to the rivets on the back of the fenders and the rivets on the PE parts) the front wheels won't touch the ground. Christ!, I have wasted so much time on these fucking things. All I can say is wait till every thing else is done- then add them- I think I will be scratching some too!
Everything is now coated in the yellow colour. (BTW I have since ripped the flaps off and sanded the plastic of any remnant CA glue)
"Don't believe everything you think"
-

Jamie Tainton - Site Admin
- Posts: 2094
- Joined: Wed Aug 19, 2009 1:01 pm
- Location: Vancover BC Canada
Re: Adler Kfz. 13 ~ Bronco Models
![]() by Jamie Tainton » Mon Oct 11, 2010 9:02 pm
by Jamie Tainton » Mon Oct 11, 2010 9:02 pm
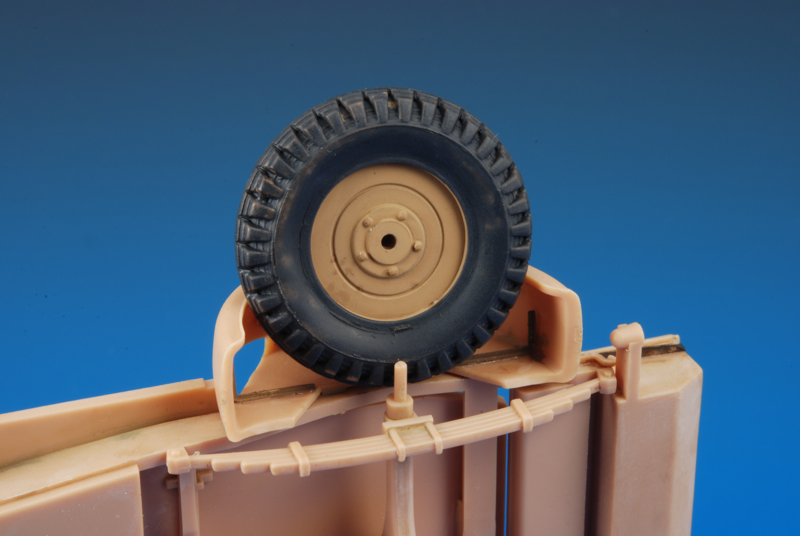
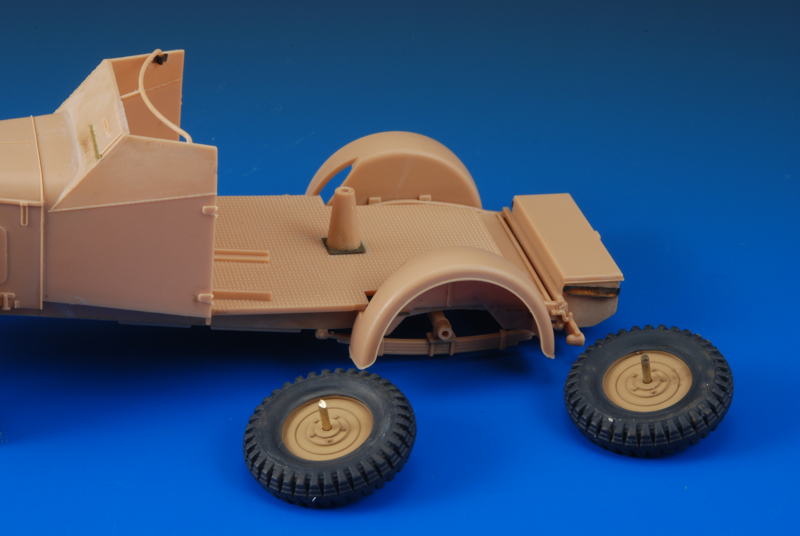
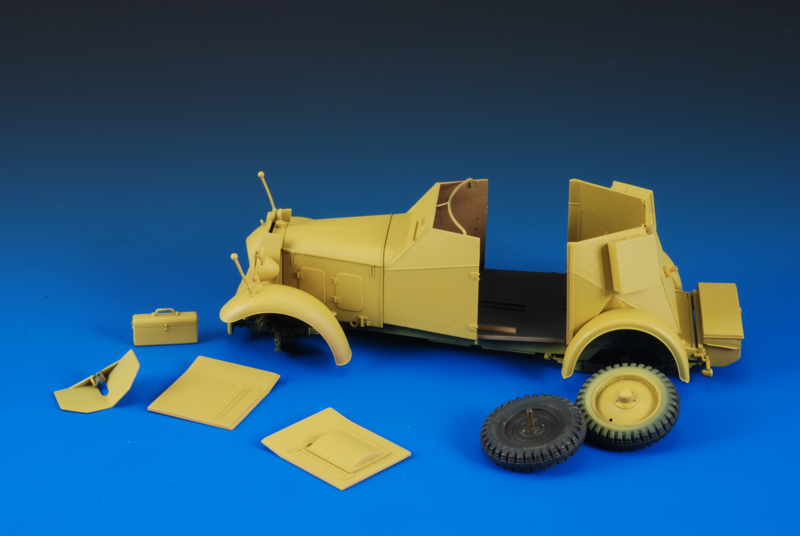
So this update will show how I have improved the mounting of the wheels on the front axle. The way Bronco has provided is very weak. The pin on the axle part is tiny and too small in diameter to fit properly into the wheel hole, the fit is very loose. I decided to fit some metal tube over the pin and the have the wheel part also have a slightly larger diameter piece of brass tube that will slip over that. The wheel hole needed to be drilled out and the pin on the axle slightly narrowed to accommodate this, but I am happy with the results.
I should also say after doing more reading on the subject it appears this and the other Kfz kit from Bronco is actually an early version if not the prototype. In future I will perhaps try and make one that was used on the front lines with all the necessary addition/corrections, but for now I will be happy to build these two straight out of the box. I sure hope someone will provide some after-market goodies!
In this picture I have replaced a lost item -I hate these stupid PE parts for the fenders- they have eaten so much time!
(I used some Evergreen pre cut plastic strips for the Kfz 14 fenders)
I used the ones from the Kfz 14 kit as I lost this one and one from the other side when spraying it out with the dark grey you see on the lower aspects now. I painted that area grey as I figured that the Germans would probably painted only the easily reached areas of the armour plate. I also have since painted the interior floor dark grey as well.
Here you can see the feeble pin and gaping hole that Bronco's engineers created.
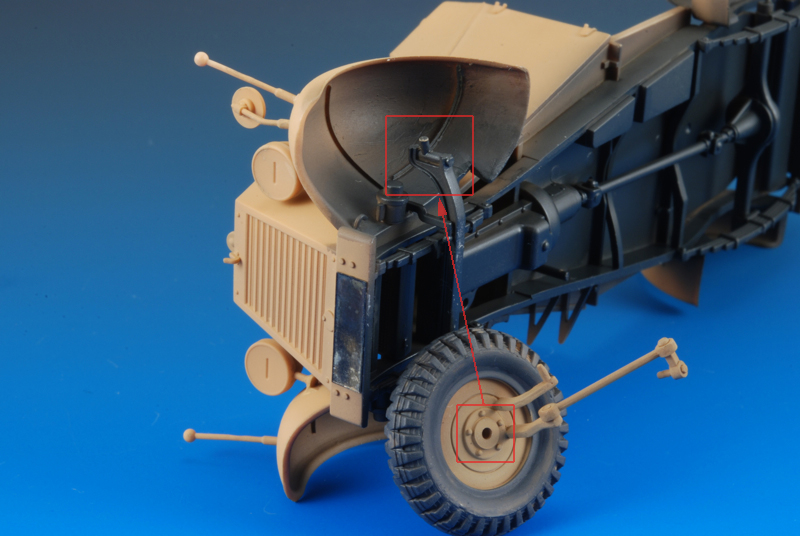
the pin has been thinned in diameter and the wheel drilled out and fitted with the brass tube. The tube was cut to the appropriate length , like a few millimetre after the fitting of the tube.
the lower chassis in grey
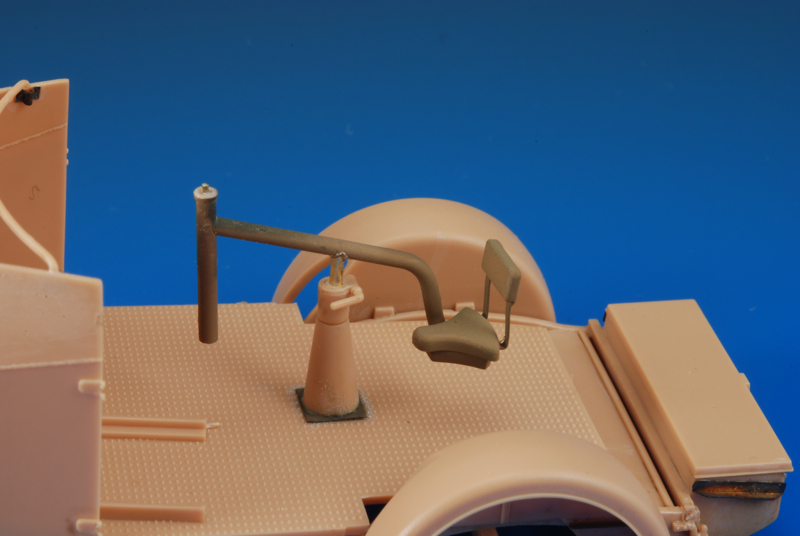
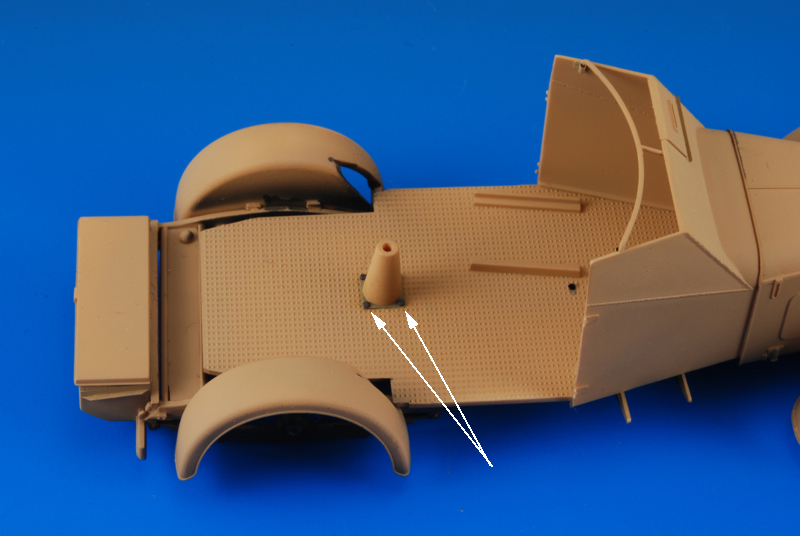
Also added some scrape bolt heads to the MG pedestal.
the two pieces of tube in place that are now to secure the front wheel.
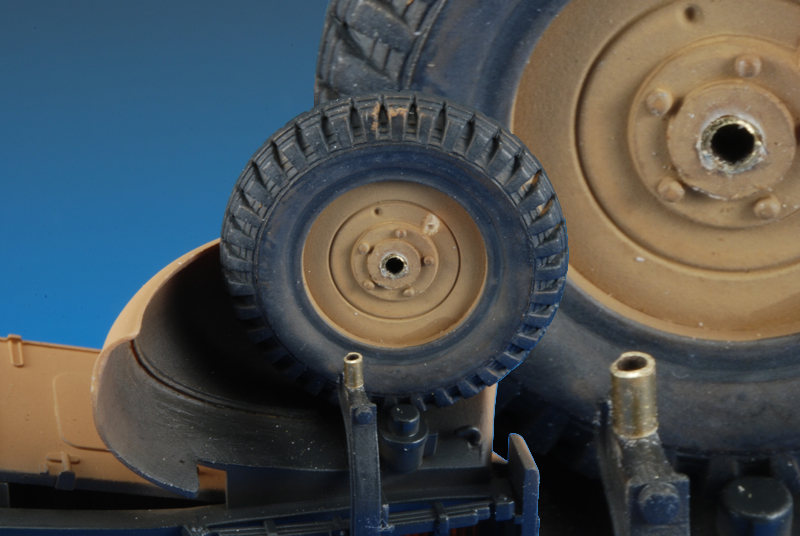
Dry fit of the wheels
I should also say after doing more reading on the subject it appears this and the other Kfz kit from Bronco is actually an early version if not the prototype. In future I will perhaps try and make one that was used on the front lines with all the necessary addition/corrections, but for now I will be happy to build these two straight out of the box. I sure hope someone will provide some after-market goodies!
In this picture I have replaced a lost item -I hate these stupid PE parts for the fenders- they have eaten so much time!
(I used some Evergreen pre cut plastic strips for the Kfz 14 fenders)
I used the ones from the Kfz 14 kit as I lost this one and one from the other side when spraying it out with the dark grey you see on the lower aspects now. I painted that area grey as I figured that the Germans would probably painted only the easily reached areas of the armour plate. I also have since painted the interior floor dark grey as well.
Here you can see the feeble pin and gaping hole that Bronco's engineers created.
the pin has been thinned in diameter and the wheel drilled out and fitted with the brass tube. The tube was cut to the appropriate length , like a few millimetre after the fitting of the tube.
the lower chassis in grey
Also added some scrape bolt heads to the MG pedestal.
the two pieces of tube in place that are now to secure the front wheel.
Dry fit of the wheels
"Don't believe everything you think"
-
Jamie Tainton - Site Admin
- Posts: 2094
- Joined: Wed Aug 19, 2009 1:01 pm
- Location: Vancover BC Canada
Re: Adler Kfz. 13 ~ Bronco Models
![]() by Jamie Tainton » Mon Oct 11, 2010 9:17 pm
by Jamie Tainton » Mon Oct 11, 2010 9:17 pm
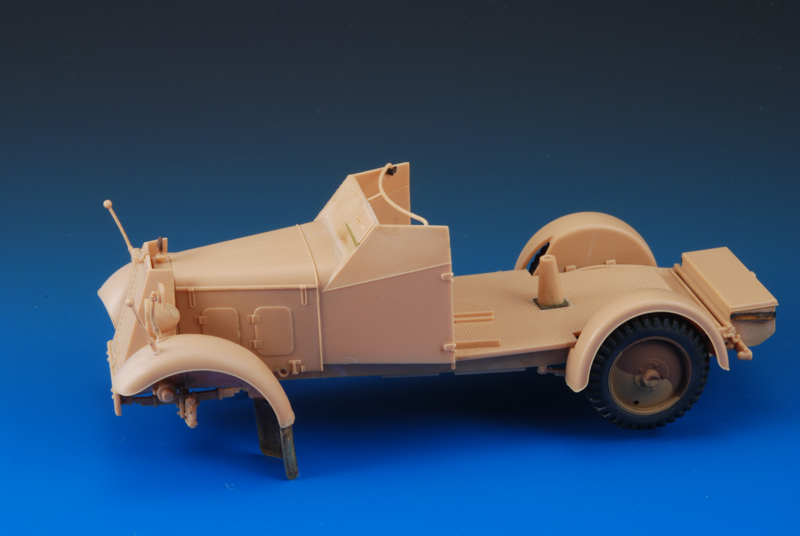
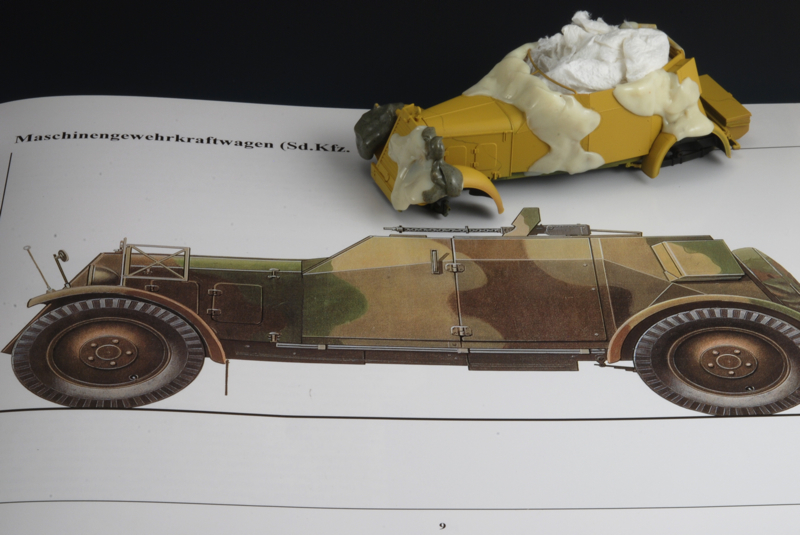
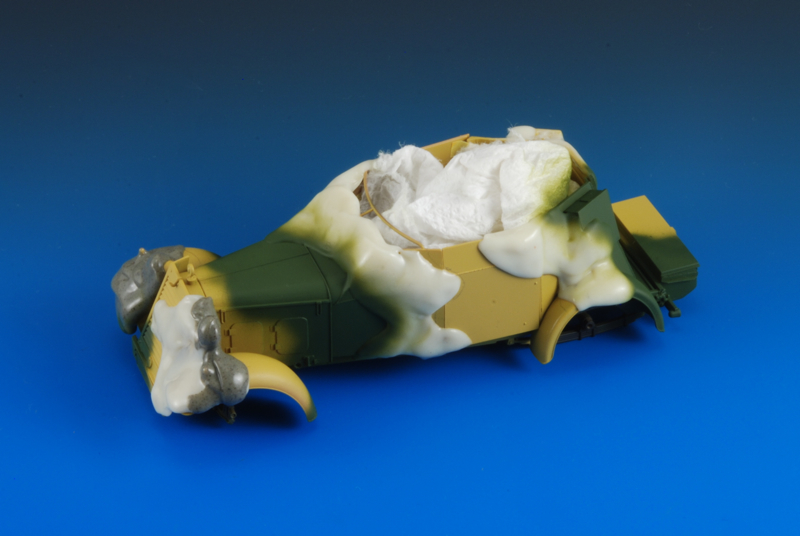
Tonight I also painted the yellow again. It just seemed to be too much like a beige/dark yellow colour. I used the recommended Humbrol 94 and 186 but I think they may have changed the #94 hue since that recipe on line was made- the #94 I have is used for Dunklegelb by some modellers, I think the old one was more yellowy.
I am switching to water based acryilic by Gunze
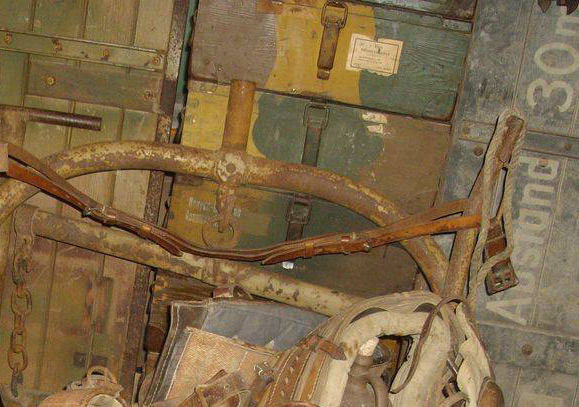
- a mix of Aqueus Hobby Color #34 and a dash of #403 to bring it closer to this yellow seen in this picture of old ammo cases.
(looks a little green in these pics, probably because to the blue backdrop. The yellow is a bit on the canary side in these pics, in real life it is a bit darker and closer to the above picture. You'll see in subsquent images, [I hope])
You can see the dark grey painted floor as well in these shots.
I am switching to water based acryilic by Gunze
- a mix of Aqueus Hobby Color #34 and a dash of #403 to bring it closer to this yellow seen in this picture of old ammo cases.
(looks a little green in these pics, probably because to the blue backdrop. The yellow is a bit on the canary side in these pics, in real life it is a bit darker and closer to the above picture. You'll see in subsquent images, [I hope])
You can see the dark grey painted floor as well in these shots.
"Don't believe everything you think"
-
Jamie Tainton - Site Admin
- Posts: 2094
- Joined: Wed Aug 19, 2009 1:01 pm
- Location: Vancover BC Canada
Re: Adler Kfz. 13 ~ Bronco Models
![]() by Darren Gawle » Mon Oct 11, 2010 9:42 pm
by Darren Gawle » Mon Oct 11, 2010 9:42 pm
If the tone matches the yellow you used on your Pz.Ia many moons ago, I think you ought to be safe.
DG
DG
- Darren Gawle
- Posts: 49
- Joined: Mon Mar 01, 2010 2:47 pm
Re: Adler Kfz. 13 ~ Bronco Models
![]() by Dan Reed » Tue Oct 12, 2010 6:16 am
by Dan Reed » Tue Oct 12, 2010 6:16 am
Great info here-you have made some modellers life's easier with your photos.
Dan
Dan
- Dan Reed
- Posts: 271
- Joined: Sun Dec 20, 2009 10:54 pm
- Location: Buffalo, MN
Re: Adler Kfz. 13 ~ Bronco Models
![]() by Dario Risso » Tue Oct 12, 2010 9:56 am
by Dario Risso » Tue Oct 12, 2010 9:56 am
-

Dario Risso - Posts: 566
- Joined: Thu Aug 27, 2009 6:04 pm
- Location: Rosario, Argentina
Re: Adler Kfz. 13 ~ Bronco Models
![]() by Jamie Tainton » Mon Oct 25, 2010 8:36 pm
by Jamie Tainton » Mon Oct 25, 2010 8:36 pm
Thanks fellas and I am sorry that I have not been able to post any updates for awhile, been travelling and working during my waking moments lately, but I did manage to do some painting on Sunday. I'm not sure of the results yet- I hope it'll all make sense once I do a few things like filter and washes and other weathering techniques.
I decided to use the reference in the Panzerspahwagen book by Ryton. There is a rendering by Uwe Feist in there that looks good so I'll try and emulate it as best I can. I like the yellow and the red but the green is a bit strong - I may have to do some tweaking with that one!
This is just a dry fit so if anything seems wonky- it'll be rectified and everything will be straight once I glue everything in it's final setting.
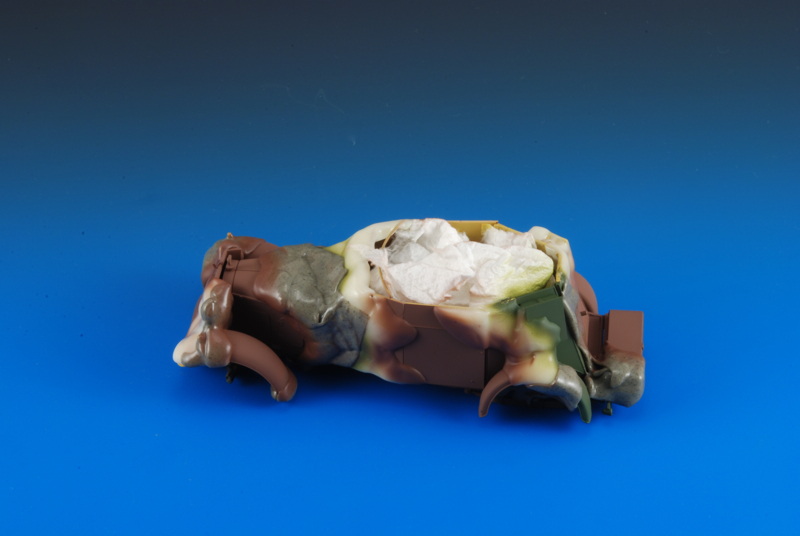
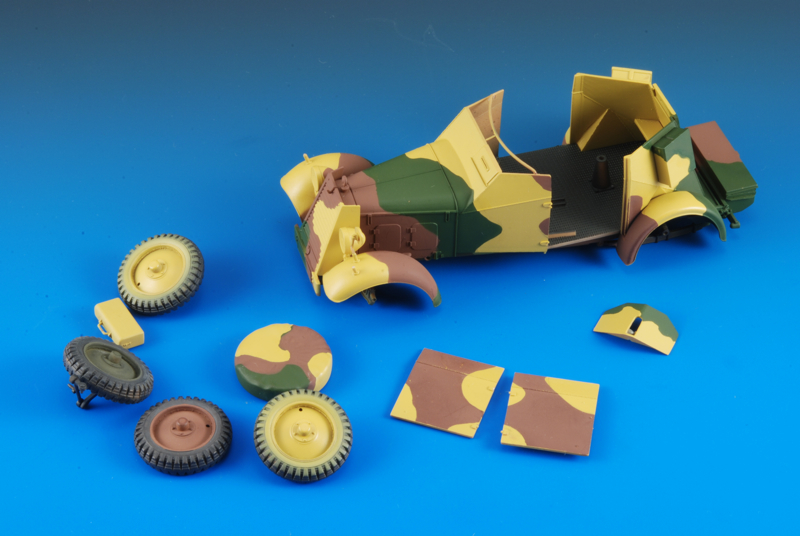
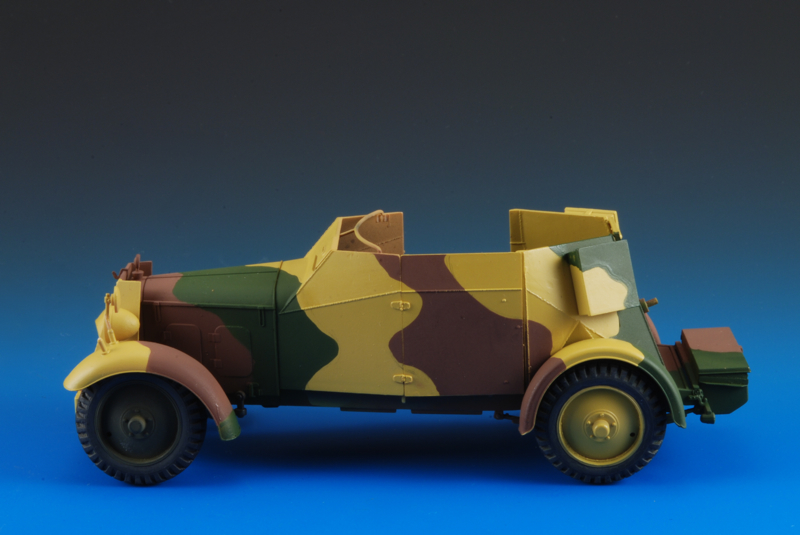
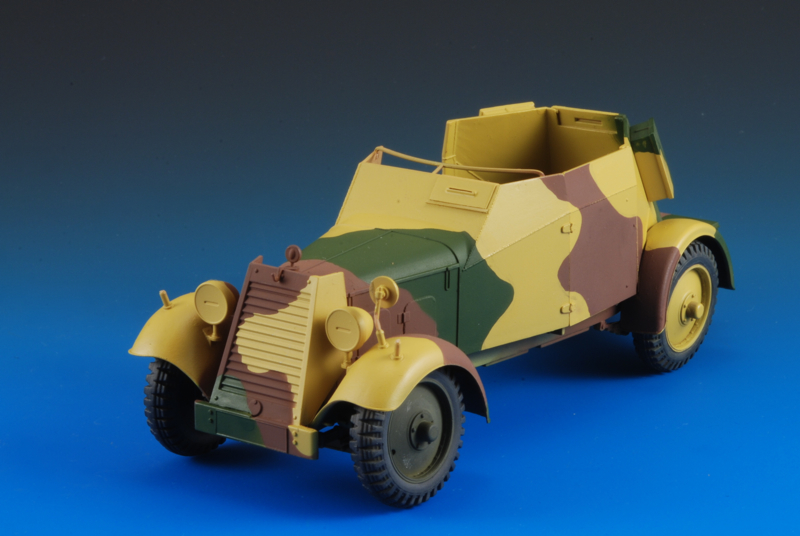
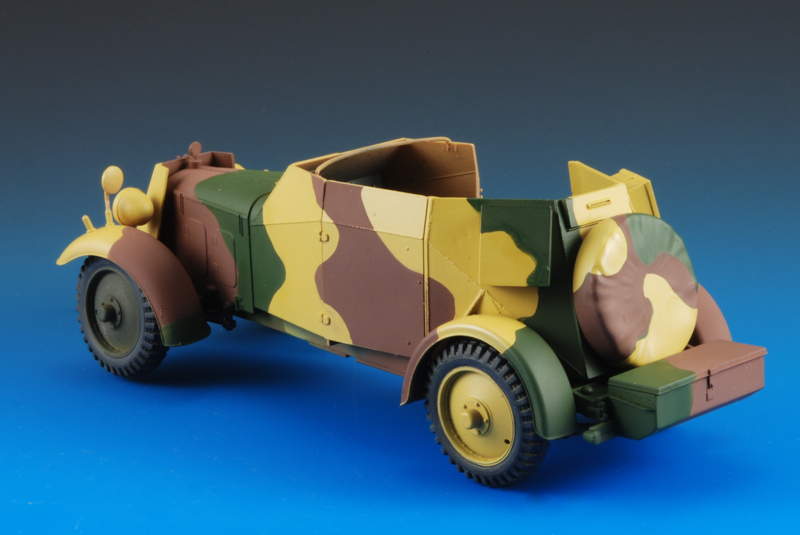
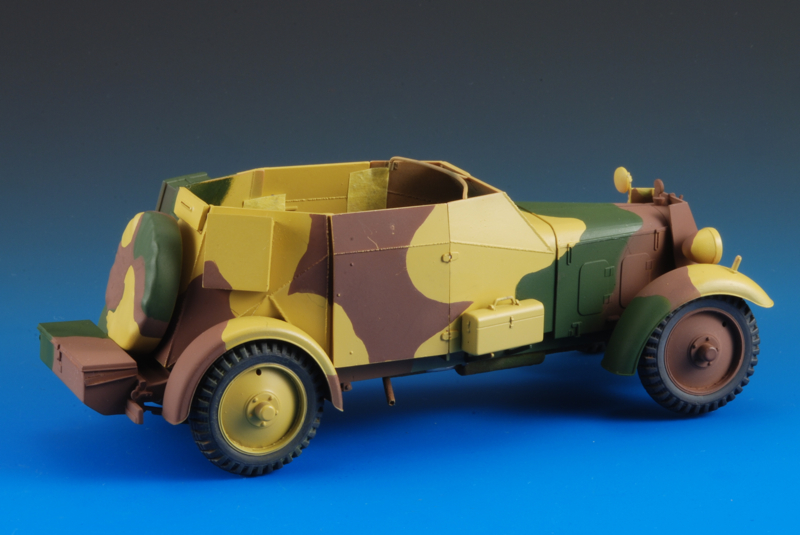
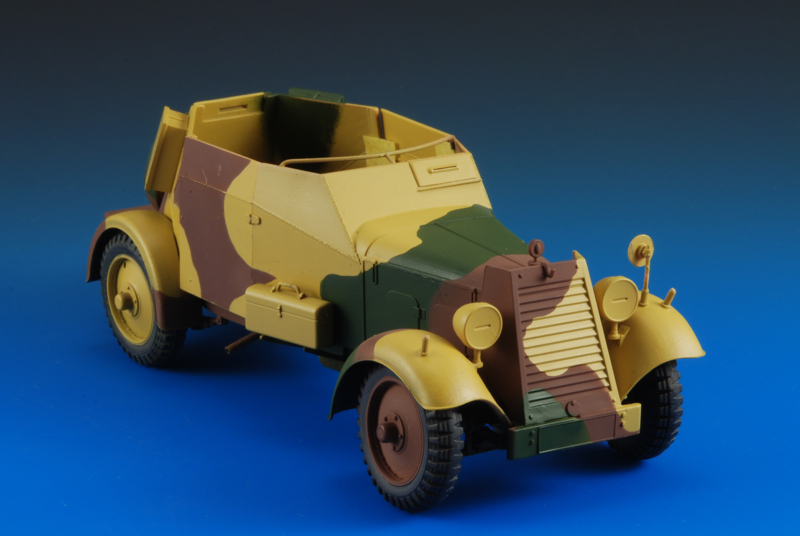
"Don't believe everything you think"
-
Jamie Tainton - Site Admin
- Posts: 2094
- Joined: Wed Aug 19, 2009 1:01 pm
- Location: Vancover BC Canada
Re: Adler Kfz. 13 ~ Bronco Models
![]() by Dan Reed » Tue Oct 26, 2010 5:39 am
by Dan Reed » Tue Oct 26, 2010 5:39 am
Nice and bright! I think that you nailed the colors correctly and will look great once toned down. These colors do look like a good camo scheme to me.
Dan
Dan
- Dan Reed
- Posts: 271
- Joined: Sun Dec 20, 2009 10:54 pm
- Location: Buffalo, MN
Re: Adler Kfz. 13 ~ Bronco Models
![]() by Jamie Tainton » Fri Nov 05, 2010 3:23 pm
by Jamie Tainton » Fri Nov 05, 2010 3:23 pm
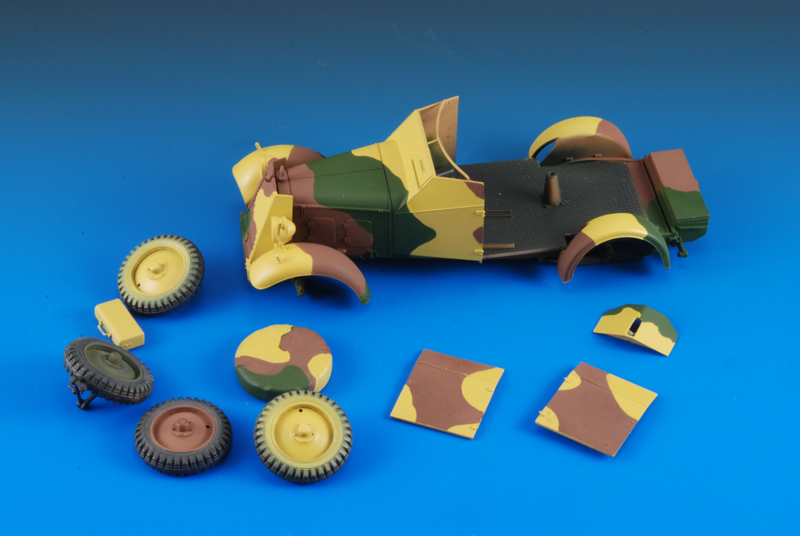
So now, finally I have the car at a point were weathering can begin!
Below is an outline of the most common methods ans order of weathering sequences.
1)~Primer/pre-shade
2)~Base colour followed by camo paint, lightest to darkest
3)~Future clear gloss
4)~Decals or dry transfers
5)~Future clear gloss
6)~Overall oil washes
7)~Clear flat
8)~Oil panel washes (filters)
9)~Oil pin washes
10)~Oil drybrushing
11)~Oil staining (dot method)
12)~Chipping and scuffing
13)~Pigments
13)~Mount to base so nobody touches the pigments
"Don't believe everything you think"
-
Jamie Tainton - Site Admin
- Posts: 2094
- Joined: Wed Aug 19, 2009 1:01 pm
- Location: Vancover BC Canada
Return to Armoured cars and wheeled armoured vehicles
Who is online
Users browsing this forum: No registered users and 1 guest