This will be my first WIP here. I am building a Pantherturm using leftover parts I found I had laying around. I figured it woud be a good little project to get back into armor modeling with and give me a chance to do some scratch building as well. I will post up some pics as soon as this gets approved.
Ernie
Pantherturm
15 posts
• Page 1 of 2 • 1, 2
Pantherturm
![]() by Ernie Schafer » Sun May 29, 2011 7:25 am
by Ernie Schafer » Sun May 29, 2011 7:25 am
- Ernie Schafer
- Posts: 24
- Joined: Sat May 28, 2011 11:56 pm
- Location: New Hampshire
Re: Pantherturm
![]() by Jamie Tainton » Sun May 29, 2011 11:18 am
by Jamie Tainton » Sun May 29, 2011 11:18 am
Ernie, look forward to your profess photos on this project. BTW now that you have posted your initial two posts that need approval, and they were passed through, you can now post without such constraints. 
"Don't believe everything you think"
-

Jamie Tainton - Site Admin
- Posts: 2094
- Joined: Wed Aug 19, 2009 1:01 pm
- Location: Vancover BC Canada
Re: Pantherturm
![]() by Ernie Schafer » Sun May 29, 2011 12:01 pm
by Ernie Schafer » Sun May 29, 2011 12:01 pm
Thank you!, I will post up some stuff in a bit.
Ernie
Ernie
- Ernie Schafer
- Posts: 24
- Joined: Sat May 28, 2011 11:56 pm
- Location: New Hampshire
Re: Pantherturm
![]() by Ernie Schafer » Sun May 29, 2011 12:53 pm
by Ernie Schafer » Sun May 29, 2011 12:53 pm
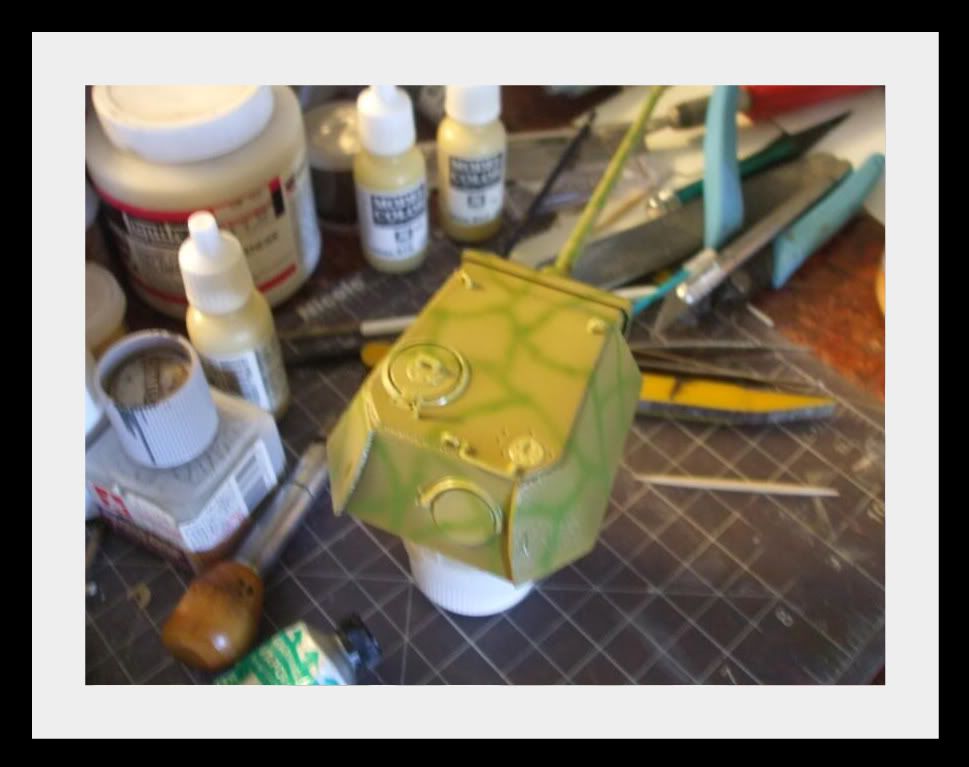
The Pantherturm's were a two piece box that was buried in the ground and mounted a Panther turret on top. Some 120 of these units were built and installed in Italy and Germany todward the end of the war. Three types of turrets were mounted; refurbished Ausf. D turrets, new production Ausf.A turrets and specially built "Ostwallen" turrrets. The "Ostwallen" turrets differed in having a thicker roof plate, simplified roof hatch, slightly relocated hatch for the close in defense weapon, and no smoke fan. It was based on the Ausf.A turret. This is the version I chose to model as it is different from the others and specific to this instillation.
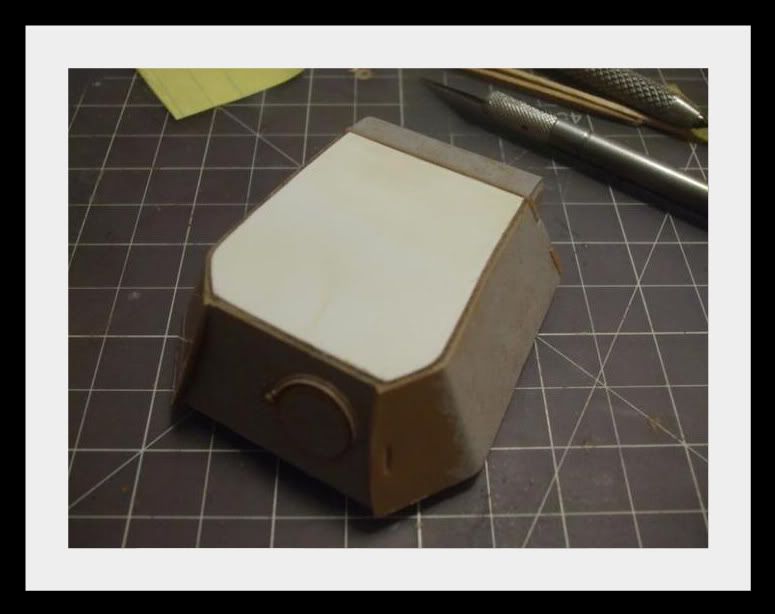
This is a little project I have been working on to get back into armor modeling. The main purpose of this build is to have something to use to try out a lot of different painting and weathering techniques that have come about in the time I have been away from building armor. Plus, it is a nice little project that will require some scratchbuilding and some research. Basically just a nice little project to get going again. All the parts I dug out of my parts box so it is also inexpensive, which fits my budget right now too! The basic turret is the Italeri Panther Ausf.A turret.
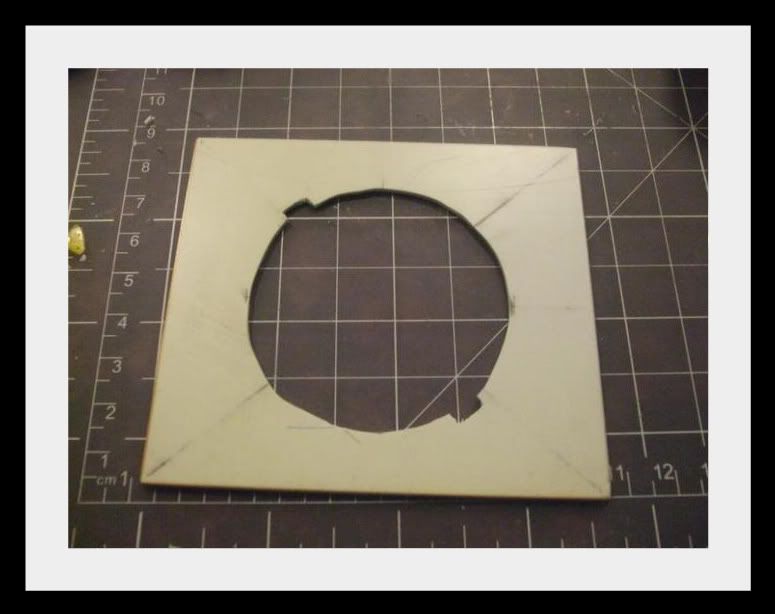
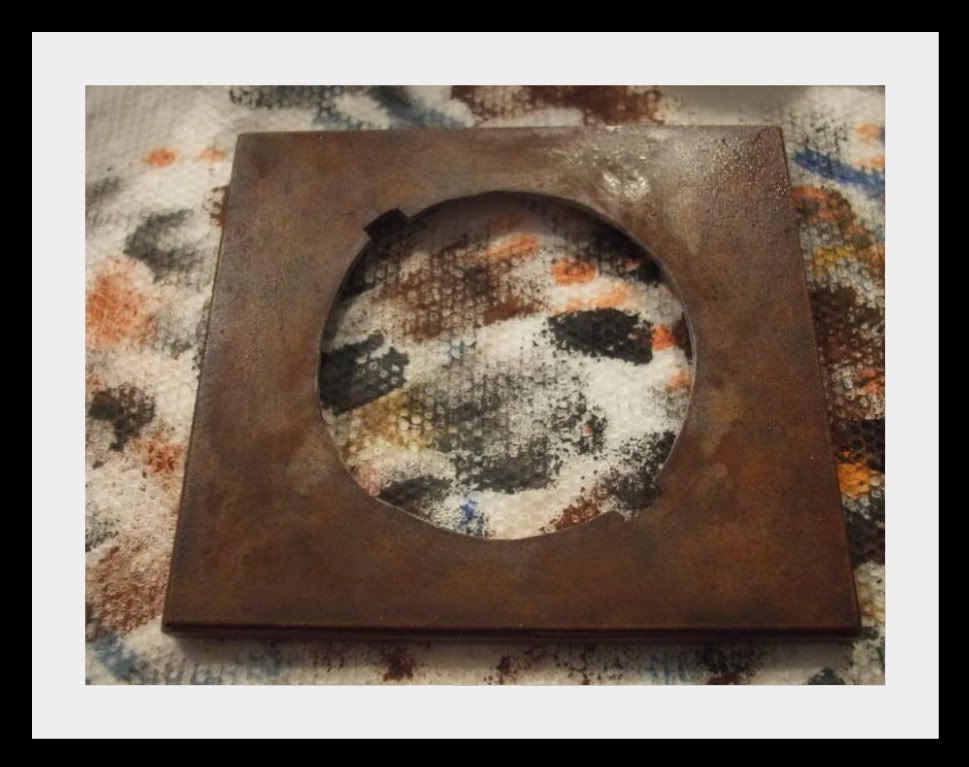
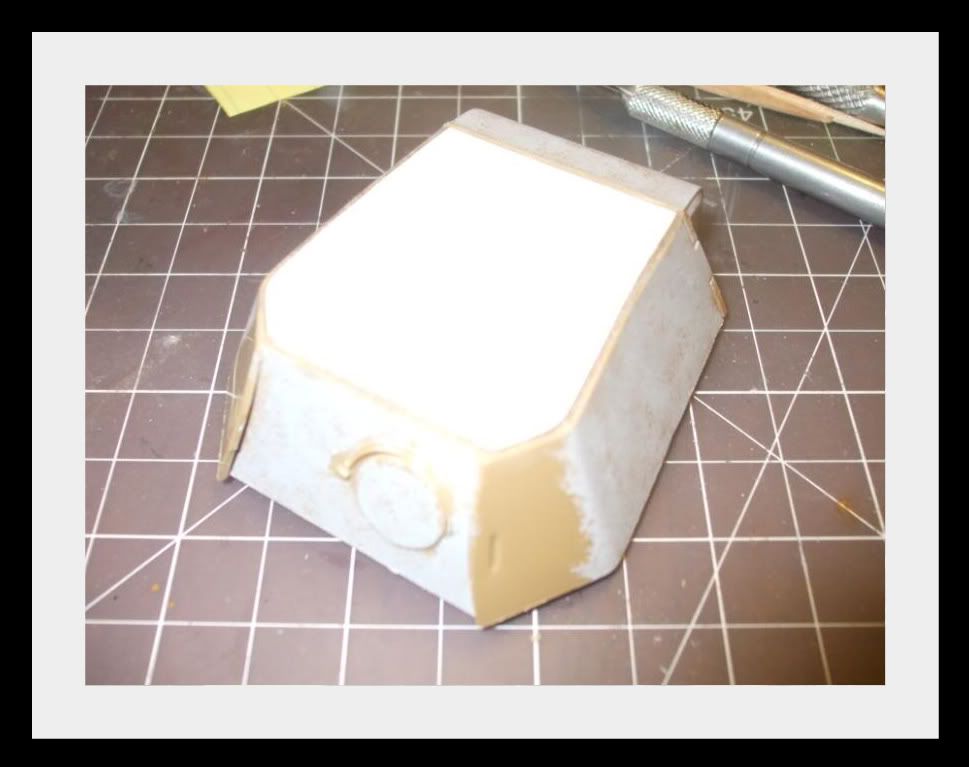
Anyway to start, I used the dimensions in the Tech Intell books to layout the base (I also ordered the Panzer Tracts Vol. 21-2) onto a piece of .040 sheet and cut that out as well as the opening for the turret.
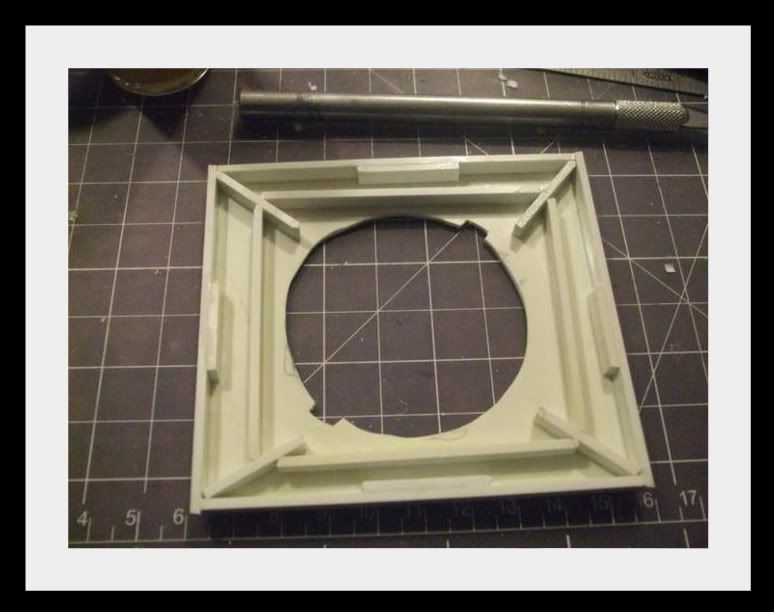
I then used some .125 X .125 Evergreen strip to build the edges and also reinforce the under side so it would not flex or sag.
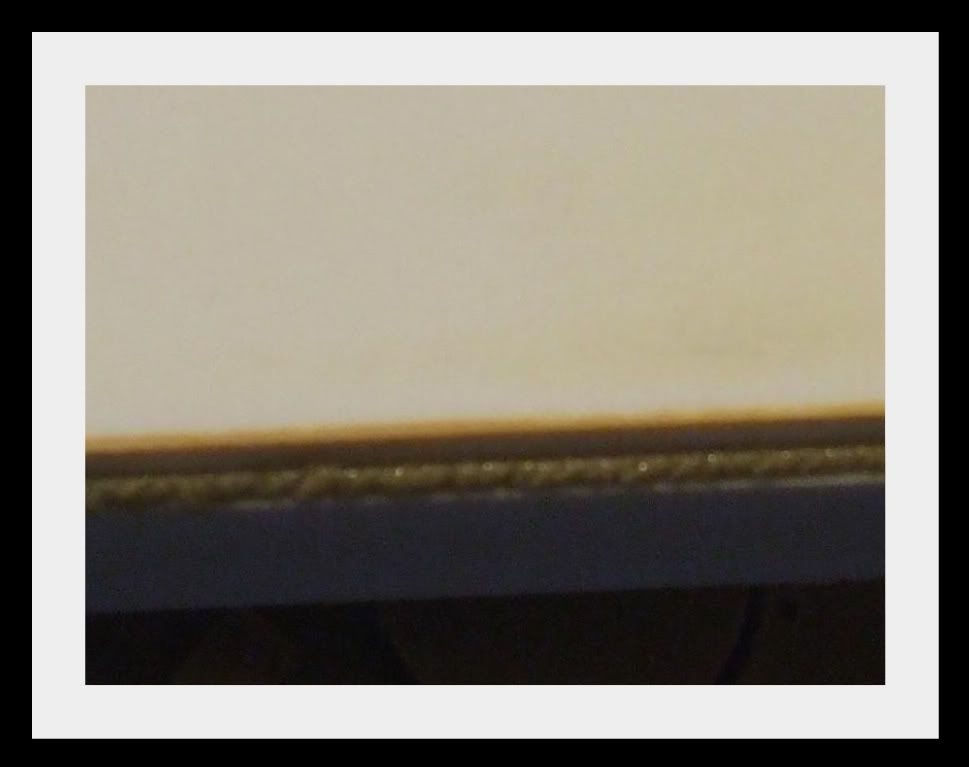
I used streached sprue to add the weld bead around the edge. Liquid cement was used to soften the sprue and then it was textured with the tip of a knife blade.
Now for some fun, I wanted to depict a late war instillation that was quickly put into place without the steel casement being painted and thus rusty, raw steel. This was simple because I wanted to try to get a nice rusty finish that I was happy with (that I could use on future projects).
First the top was sprayed with a medium grey, and edge was sprayed with a dark reddish color.
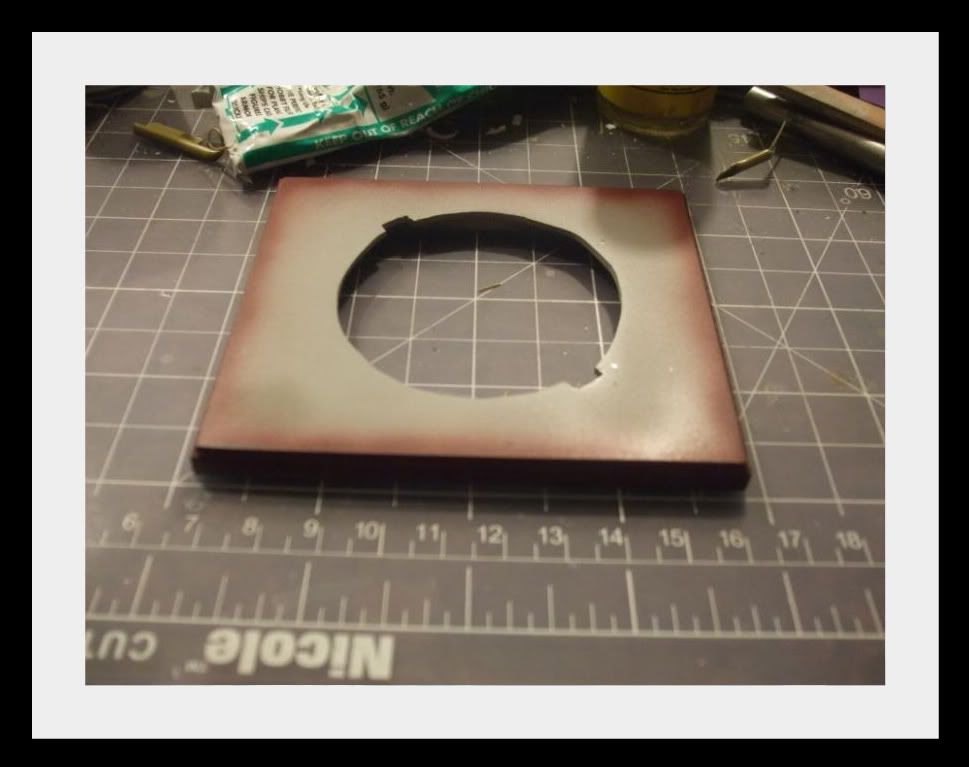
Next I took a piece of sponge from one of those inexpensive foam craft brushes and dabbed various rust, red, and orange colors Vallejo and allowed to dry. I kept the coverage heaviest near the edges of the top plate and slightely lessened them as I got closer to the center.
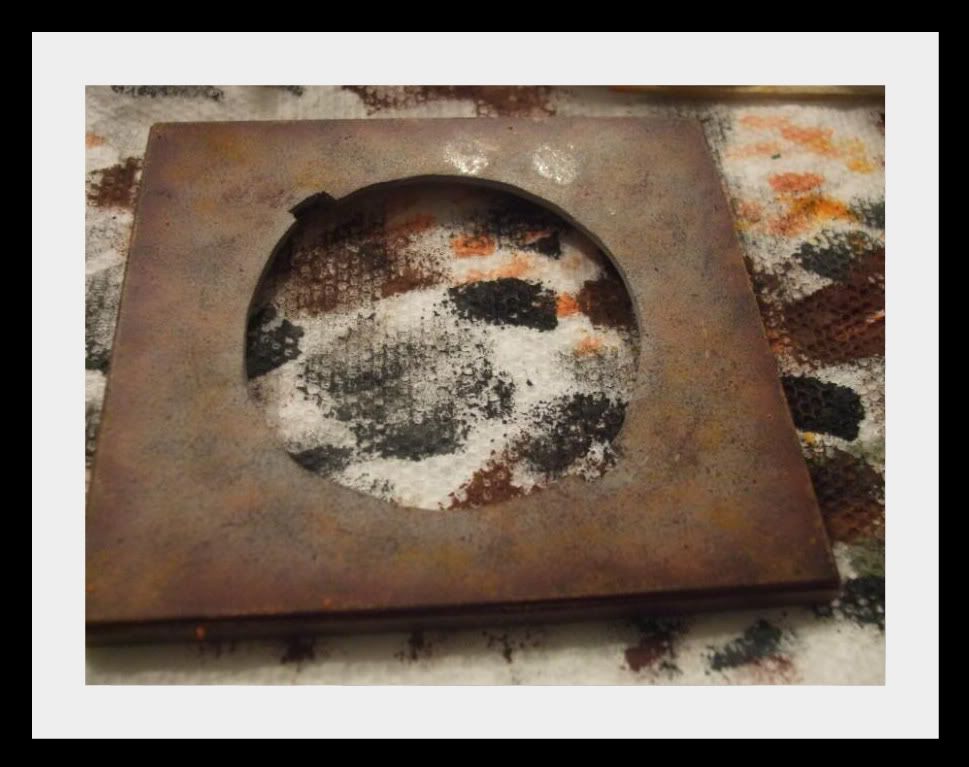
After the Vallejo dried I used brown and rust colored oils to blend the all the colors and to unify them somewhat without muting them out.
Lastly, some rust colored pigments were dusted on and sealed in with a light spray of Dulcote shot through the airbrush.
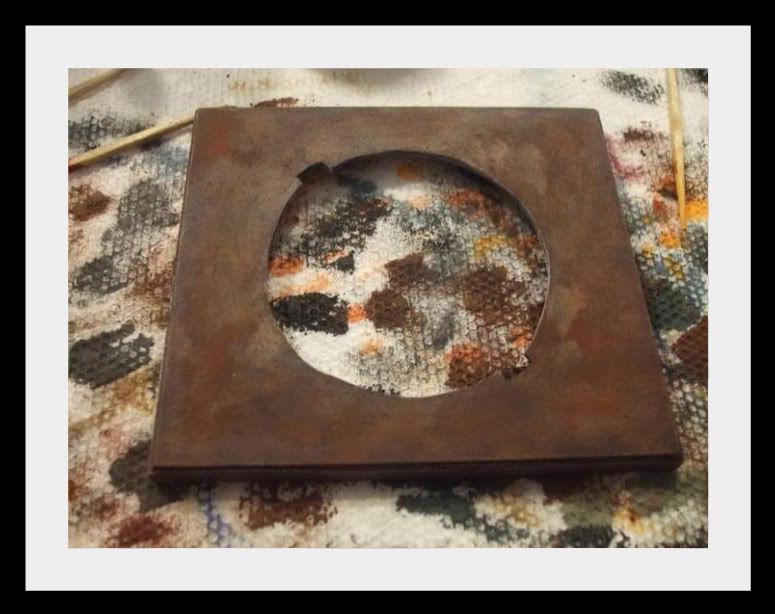
This is as far as I am going with this part for the moment, I will add some further dust and rust when I add this to a small base with some groundwork.
Next is the work on the turret.
Ernie
This is a little project I have been working on to get back into armor modeling. The main purpose of this build is to have something to use to try out a lot of different painting and weathering techniques that have come about in the time I have been away from building armor. Plus, it is a nice little project that will require some scratchbuilding and some research. Basically just a nice little project to get going again. All the parts I dug out of my parts box so it is also inexpensive, which fits my budget right now too! The basic turret is the Italeri Panther Ausf.A turret.
Anyway to start, I used the dimensions in the Tech Intell books to layout the base (I also ordered the Panzer Tracts Vol. 21-2) onto a piece of .040 sheet and cut that out as well as the opening for the turret.
I then used some .125 X .125 Evergreen strip to build the edges and also reinforce the under side so it would not flex or sag.
I used streached sprue to add the weld bead around the edge. Liquid cement was used to soften the sprue and then it was textured with the tip of a knife blade.
Now for some fun, I wanted to depict a late war instillation that was quickly put into place without the steel casement being painted and thus rusty, raw steel. This was simple because I wanted to try to get a nice rusty finish that I was happy with (that I could use on future projects).
First the top was sprayed with a medium grey, and edge was sprayed with a dark reddish color.
Next I took a piece of sponge from one of those inexpensive foam craft brushes and dabbed various rust, red, and orange colors Vallejo and allowed to dry. I kept the coverage heaviest near the edges of the top plate and slightely lessened them as I got closer to the center.
After the Vallejo dried I used brown and rust colored oils to blend the all the colors and to unify them somewhat without muting them out.
Lastly, some rust colored pigments were dusted on and sealed in with a light spray of Dulcote shot through the airbrush.
This is as far as I am going with this part for the moment, I will add some further dust and rust when I add this to a small base with some groundwork.
Next is the work on the turret.
Ernie
- Ernie Schafer
- Posts: 24
- Joined: Sat May 28, 2011 11:56 pm
- Location: New Hampshire
Re: Pantherturm
![]() by Ernie Schafer » Sun May 29, 2011 1:32 pm
by Ernie Schafer » Sun May 29, 2011 1:32 pm
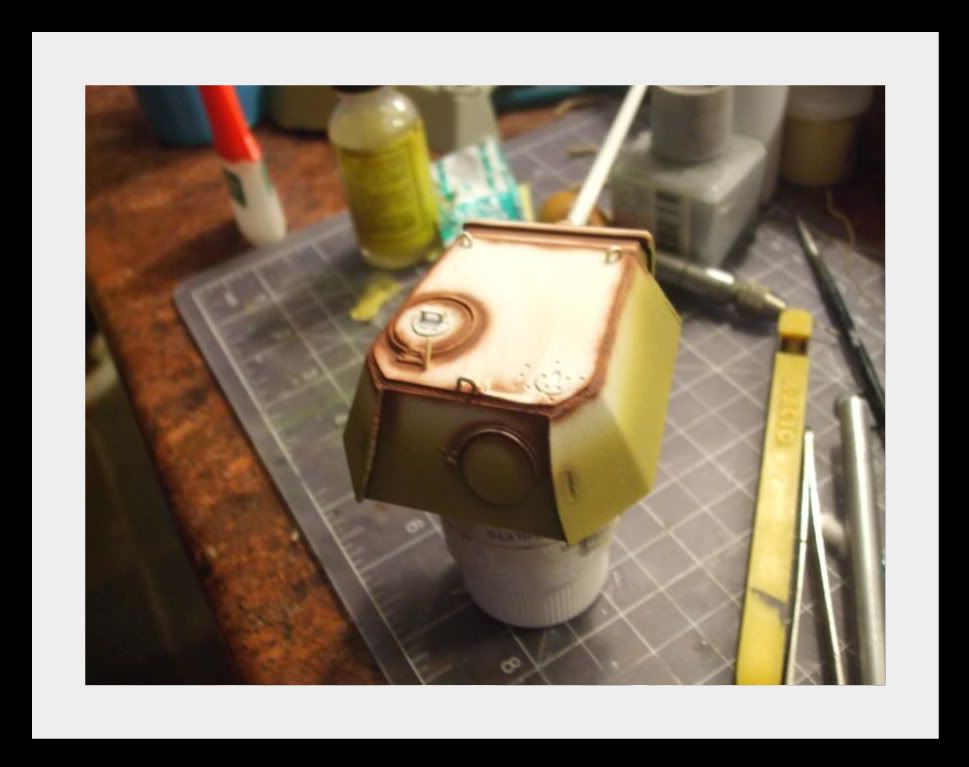
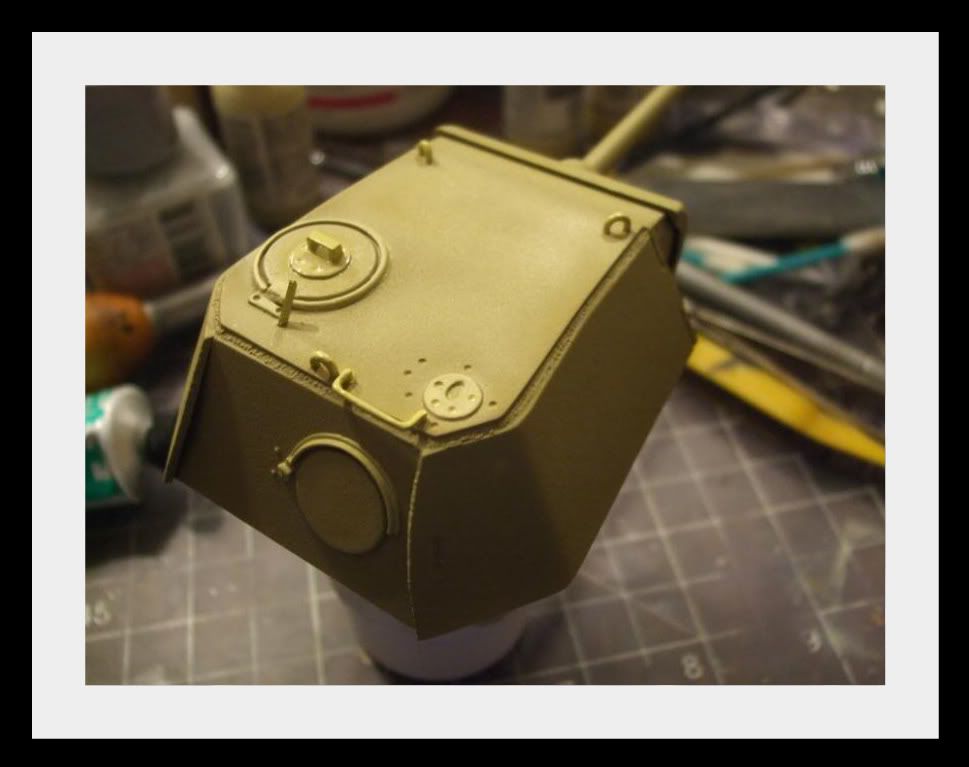
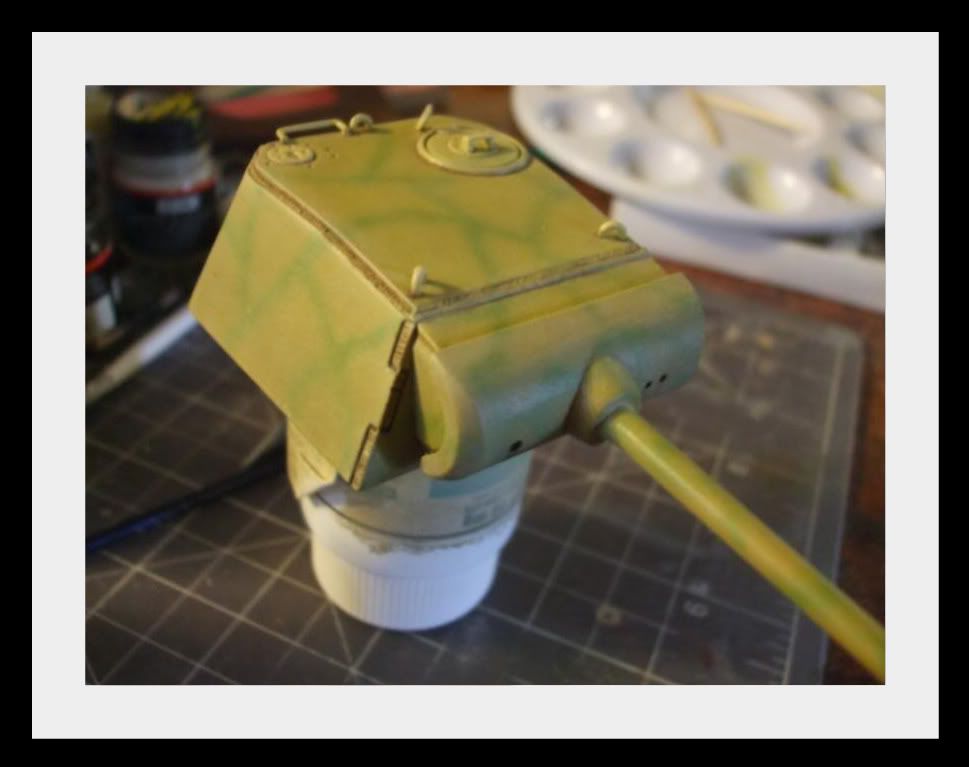
Next is work on the turret. I shaved off the molded on roof hatch and exhaust fan, then made a new roof plate from two seperate layers of .020 sheet. Streached sprue was again used for the weld bead around the edges of the new turret roof. I then made the turret hatch with a hatch from an old Tamyia Tiger I, with the pariscope and base comming form the tiger kit as well. The pariscope base I think was a cover used on the engine deck, but it matched the base in the Panzer Tracts plan, so it was sanded down to a much thinner thickness and used. The ring surrounding the hatch was made from a resin T-34 conversion hatch set (this was in the parts box, and I don't remember who the manufacturer was). The hinge for the turret hatch was made from a hinge cut from the engine deck of an old DML Stug. III. The hatch for the close defense weapon was carefully scraped off of an old Nichimo Panther G turret. Since every thing has gone well so far, I used a Jordi Rubio turned barrel. Tamyia grey primer from a bottle was used to add some texturing to the turret as well.
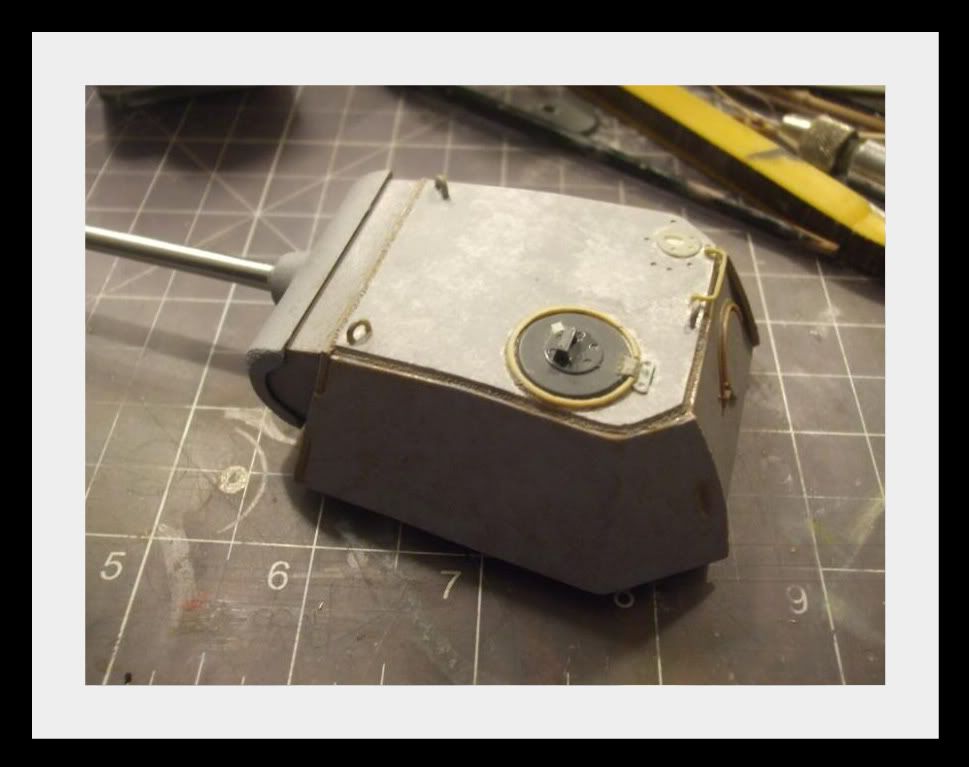
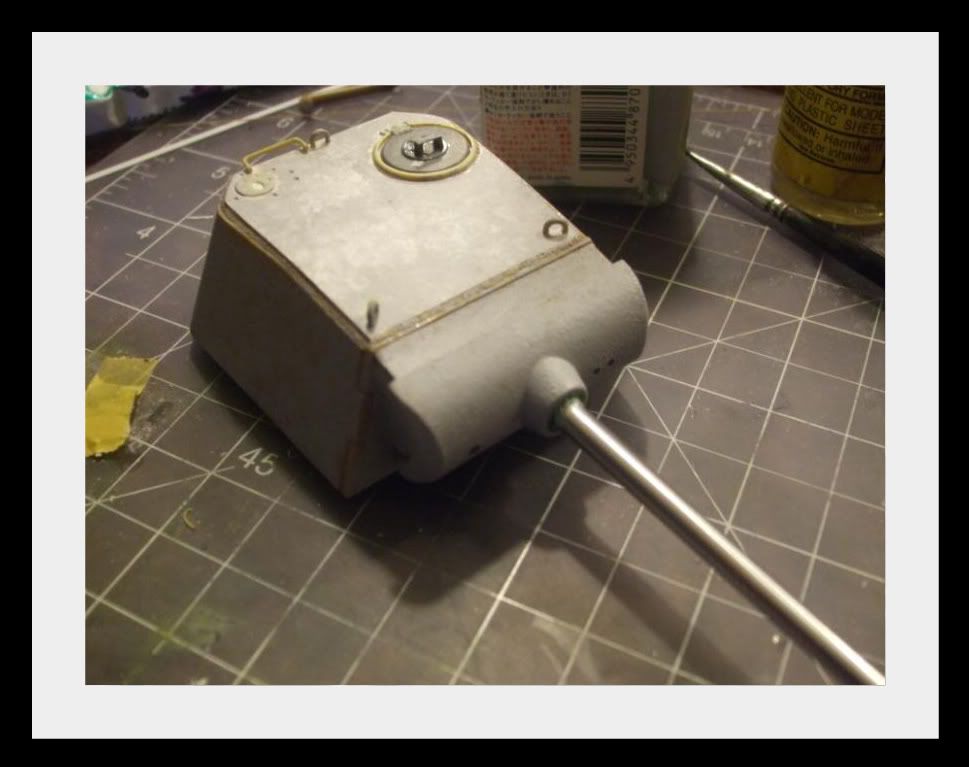
Next up is painting.
Ernie
Next up is painting.
Ernie
- Ernie Schafer
- Posts: 24
- Joined: Sat May 28, 2011 11:56 pm
- Location: New Hampshire
Re: Pantherturm
![]() by Ernie Schafer » Sun May 29, 2011 2:42 pm
by Ernie Schafer » Sun May 29, 2011 2:42 pm
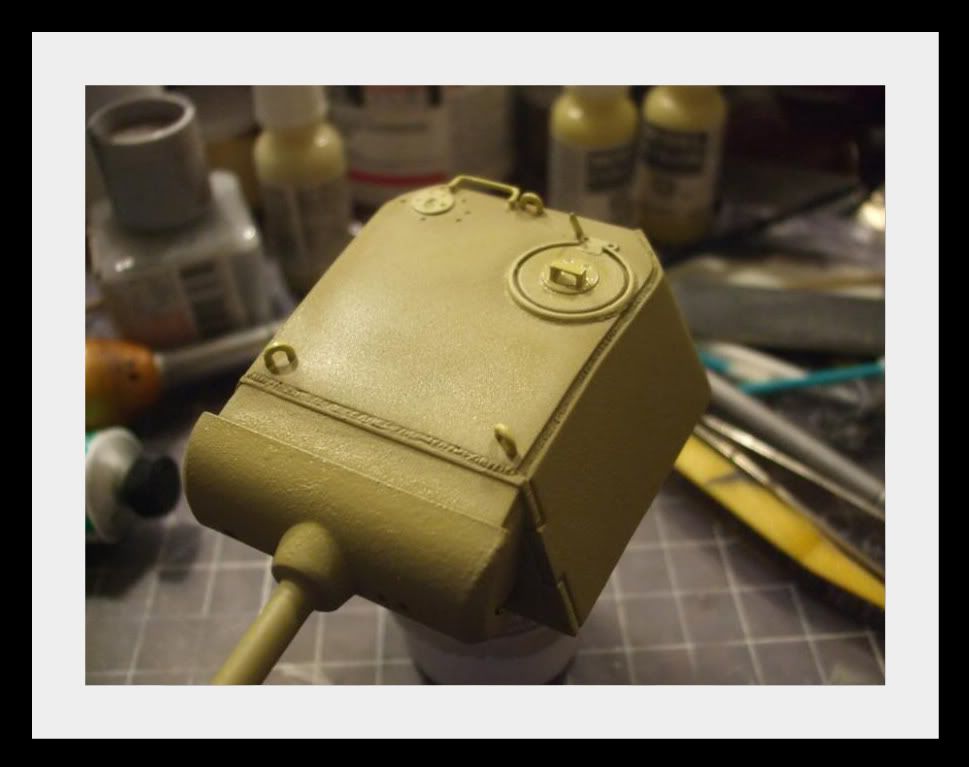
I have started painting by first giving the whol turret a shot of grey aerosol primer.

Next I have preshaded with Tamyia Red Brown.
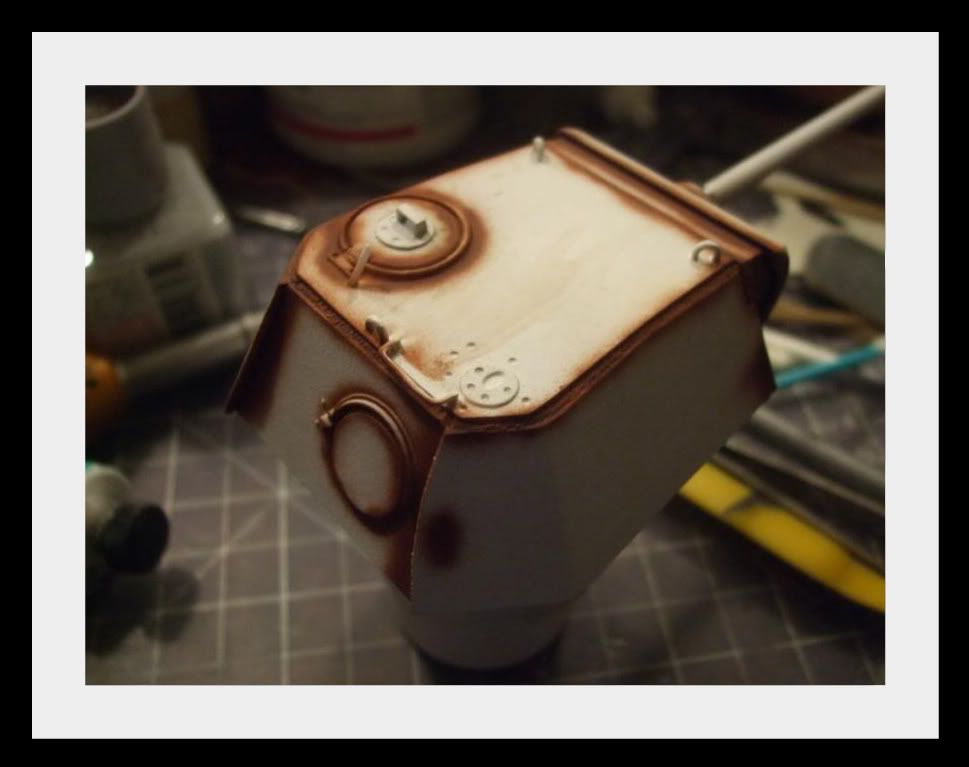
Then on with the main basse color made from Tamyia Dark yellow lightened with tan. I am kind of curious to try the color modulation process that seems to be so popular right now. I admit the the results can be very pleasing, but many models I have seen seem to over do the effect and I am being very careful to try to not do that. I started with the Dark Yellow and lightened it slightly as I progressed up the sides of the turret and over the top.
Finally a lighter mixture of the base color was applied to the detail on the turret roof.
With that done I applied some camo using one of Tamyia's greens (I just grabbed one that I though would look good, I don't recall the #, but can find the bottle), then a cote of Tayia gloss to prepare for the weathering.
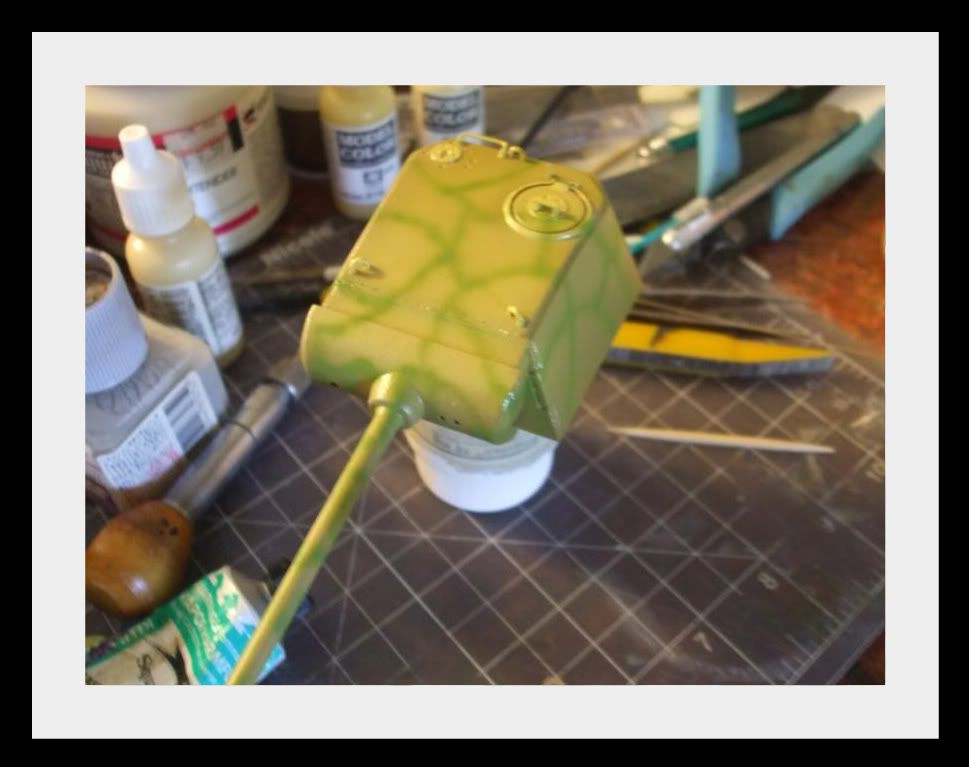
Next I have applied oil pin washes and several filters to tone down and dirty up the turret.
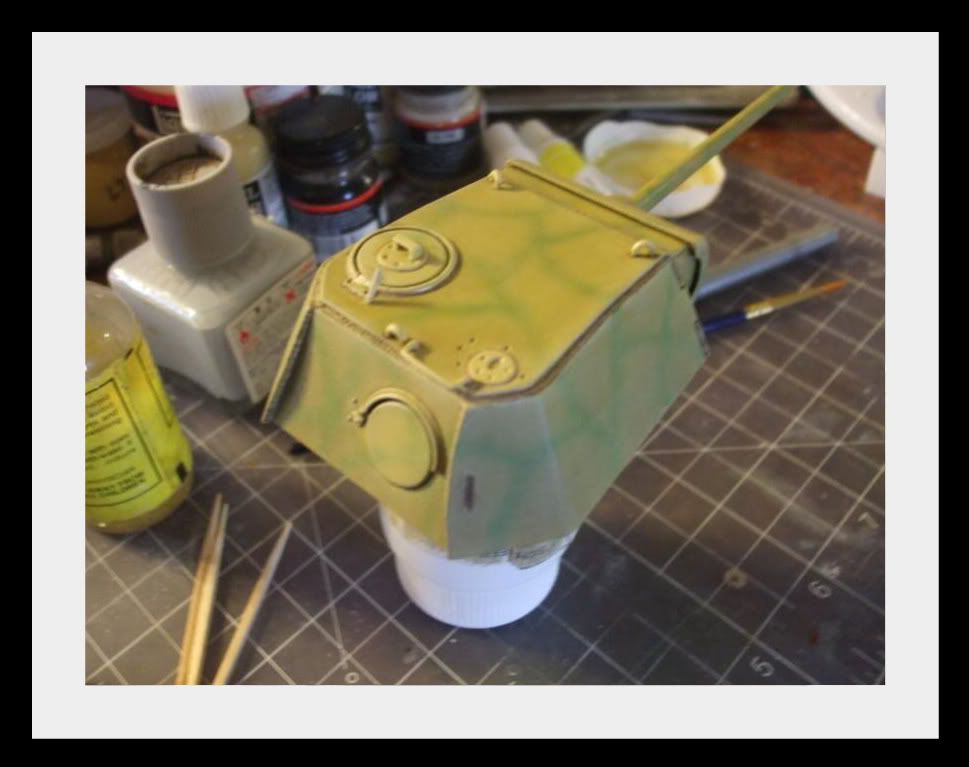
I have since added some chipping to the turret and am starting on the base for it, so that will be the next update.
Ernie
Next I have preshaded with Tamyia Red Brown.
Then on with the main basse color made from Tamyia Dark yellow lightened with tan. I am kind of curious to try the color modulation process that seems to be so popular right now. I admit the the results can be very pleasing, but many models I have seen seem to over do the effect and I am being very careful to try to not do that. I started with the Dark Yellow and lightened it slightly as I progressed up the sides of the turret and over the top.
Finally a lighter mixture of the base color was applied to the detail on the turret roof.
With that done I applied some camo using one of Tamyia's greens (I just grabbed one that I though would look good, I don't recall the #, but can find the bottle), then a cote of Tayia gloss to prepare for the weathering.
Next I have applied oil pin washes and several filters to tone down and dirty up the turret.
I have since added some chipping to the turret and am starting on the base for it, so that will be the next update.
Ernie
- Ernie Schafer
- Posts: 24
- Joined: Sat May 28, 2011 11:56 pm
- Location: New Hampshire
Re: Pantherturm
![]() by David Madsen » Mon May 30, 2011 5:17 am
by David Madsen » Mon May 30, 2011 5:17 am
I'm looking forward to this build. I like you little bit of history on the subject as well. Welcome to the forums!
-

David Madsen - Posts: 344
- Joined: Mon Nov 22, 2010 7:50 pm
- Location: Iowa, USA
Re: Pantherturm
![]() by Jamie Tainton » Mon May 30, 2011 8:41 am
by Jamie Tainton » Mon May 30, 2011 8:41 am
Excellent and unique presentation. 
"Don't believe everything you think"
-
Jamie Tainton - Site Admin
- Posts: 2094
- Joined: Wed Aug 19, 2009 1:01 pm
- Location: Vancover BC Canada
Re: Pantherturm
![]() by Ernie Schafer » Tue May 31, 2011 5:16 pm
by Ernie Schafer » Tue May 31, 2011 5:16 pm
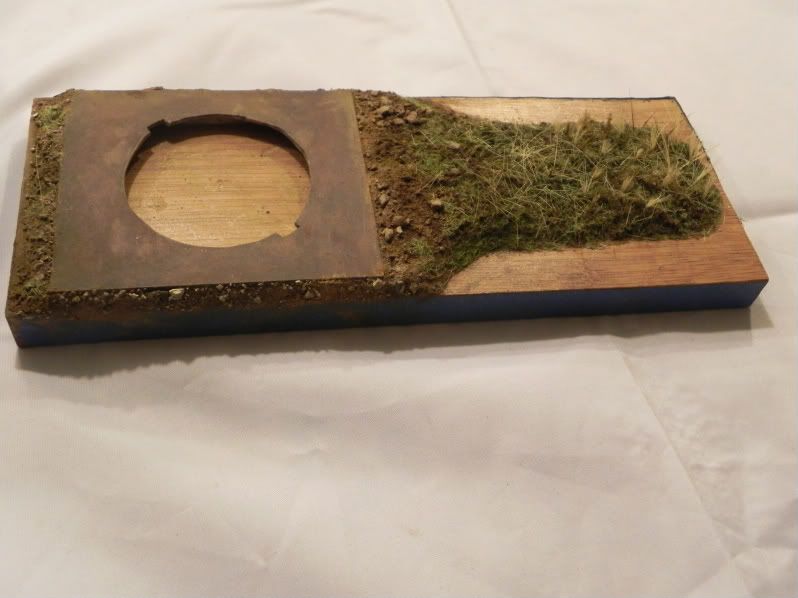
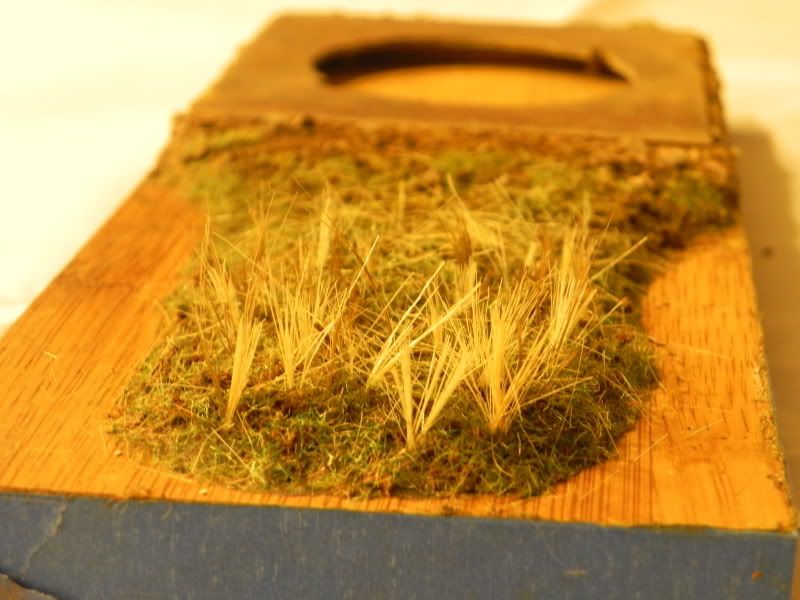
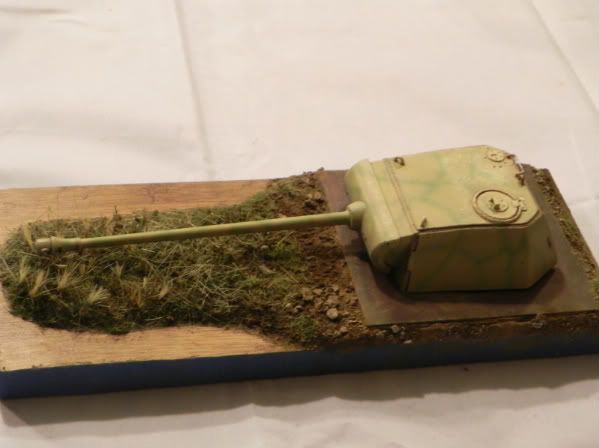
Yesterdays fun was strating the base. I wanted something that was kind of compact and that would highlight the model itself. I came up with a piece of Bamboo, I wish it was just a bit wider, but it was what I had to work with so...... The groundwork is built up from light weight wall spackle thta was colored with some brown craft paint. Before it set some pieces of Oil Dry were pressed in for rocks and and gravel texture. The grass areas got a base ofground up Birch tree seeed pods from my yard. A layer of static grass was added and then this was sprayed lightly with a couple of different dark greens. More static grass was added but left as is, as well as some more field grass. The earthen areas were done with pigments, I first wetted the area and then sprinkled three different colors of pigment from a paint brush held above the area. Still some more to do, but I think it is getting there.
And with the turret just set into place
Ernie
And with the turret just set into place
Ernie
- Ernie Schafer
- Posts: 24
- Joined: Sat May 28, 2011 11:56 pm
- Location: New Hampshire
15 posts
• Page 1 of 2 • 1, 2
Return to Panzerkampfwagen V and variants
Who is online
Users browsing this forum: No registered users and 1 guest