[phpBB Debug] PHP Notice: in file /includes/bbcode.php on line 483: preg_replace(): The /e modifier is no longer supported, use preg_replace_callback instead
[phpBB Debug] PHP Notice: in file /includes/bbcode.php on line 483: preg_replace(): The /e modifier is no longer supported, use preg_replace_callback instead
[phpBB Debug] PHP Notice: in file /includes/bbcode.php on line 483: preg_replace(): The /e modifier is no longer supported, use preg_replace_callback instead
[phpBB Debug] PHP Notice: in file /includes/bbcode.php on line 483: preg_replace(): The /e modifier is no longer supported, use preg_replace_callback instead
[phpBB Debug] PHP Notice: in file /includes/bbcode.php on line 483: preg_replace(): The /e modifier is no longer supported, use preg_replace_callback instead
[phpBB Debug] PHP Notice: in file /includes/bbcode.php on line 483: preg_replace(): The /e modifier is no longer supported, use preg_replace_callback instead
[phpBB Debug] PHP Notice: in file /includes/bbcode.php on line 483: preg_replace(): The /e modifier is no longer supported, use preg_replace_callback instead
[phpBB Debug] PHP Notice: in file /includes/bbcode.php on line 483: preg_replace(): The /e modifier is no longer supported, use preg_replace_callback instead
[phpBB Debug] PHP Notice: in file /includes/bbcode.php on line 483: preg_replace(): The /e modifier is no longer supported, use preg_replace_callback instead
[phpBB Debug] PHP Notice: in file /includes/bbcode.php on line 483: preg_replace(): The /e modifier is no longer supported, use preg_replace_callback instead
[phpBB Debug] PHP Notice: in file /includes/bbcode.php on line 483: preg_replace(): The /e modifier is no longer supported, use preg_replace_callback instead
[phpBB Debug] PHP Notice: in file /includes/bbcode.php on line 483: preg_replace(): The /e modifier is no longer supported, use preg_replace_callback instead
[phpBB Debug] PHP Notice: in file /includes/bbcode.php on line 483: preg_replace(): The /e modifier is no longer supported, use preg_replace_callback instead
[phpBB Debug] PHP Notice: in file /includes/bbcode.php on line 483: preg_replace(): The /e modifier is no longer supported, use preg_replace_callback instead
[phpBB Debug] PHP Notice: in file /includes/bbcode.php on line 483: preg_replace(): The /e modifier is no longer supported, use preg_replace_callback instead
[phpBB Debug] PHP Notice: in file /includes/bbcode.php on line 483: preg_replace(): The /e modifier is no longer supported, use preg_replace_callback instead
[phpBB Debug] PHP Notice: in file /includes/bbcode.php on line 483: preg_replace(): The /e modifier is no longer supported, use preg_replace_callback instead
[phpBB Debug] PHP Notice: in file /includes/bbcode.php on line 483: preg_replace(): The /e modifier is no longer supported, use preg_replace_callback instead
[phpBB Debug] PHP Notice: in file /includes/bbcode.php on line 483: preg_replace(): The /e modifier is no longer supported, use preg_replace_callback instead
[phpBB Debug] PHP Notice: in file /includes/bbcode.php on line 483: preg_replace(): The /e modifier is no longer supported, use preg_replace_callback instead
[phpBB Debug] PHP Notice: in file /includes/bbcode.php on line 483: preg_replace(): The /e modifier is no longer supported, use preg_replace_callback instead
[phpBB Debug] PHP Notice: in file /includes/bbcode.php on line 483: preg_replace(): The /e modifier is no longer supported, use preg_replace_callback instead
[phpBB Debug] PHP Notice: in file /includes/bbcode.php on line 483: preg_replace(): The /e modifier is no longer supported, use preg_replace_callback instead
[phpBB Debug] PHP Notice: in file /includes/bbcode.php on line 483: preg_replace(): The /e modifier is no longer supported, use preg_replace_callback instead
[phpBB Debug] PHP Notice: in file /includes/bbcode.php on line 483: preg_replace(): The /e modifier is no longer supported, use preg_replace_callback instead
[phpBB Debug] PHP Notice: in file /includes/bbcode.php on line 483: preg_replace(): The /e modifier is no longer supported, use preg_replace_callback instead
[phpBB Debug] PHP Notice: in file /includes/functions.php on line 4294: Cannot modify header information - headers already sent by (output started at /includes/functions.php:3501)
[phpBB Debug] PHP Notice: in file /includes/functions.php on line 4296: Cannot modify header information - headers already sent by (output started at /includes/functions.php:3501)
[phpBB Debug] PHP Notice: in file /includes/functions.php on line 4297: Cannot modify header information - headers already sent by (output started at /includes/functions.php:3501)
[phpBB Debug] PHP Notice: in file /includes/functions.php on line 4298: Cannot modify header information - headers already sent by (output started at /includes/functions.php:3501)
Armour Workshop • View topic - Tristar German Flak Panzer I Ausf.A

Tristar German Flak Panzer I Ausf.A

Tristar German Flak Panzer I Ausf.A

Postby Jamie Tainton » Wed Aug 26, 2009 1:16 am

Moving this little guy over here to be completed.

Image

The boxart- wish I could watch this guy in action to steal some of his techniques- I wonder how much time they get!

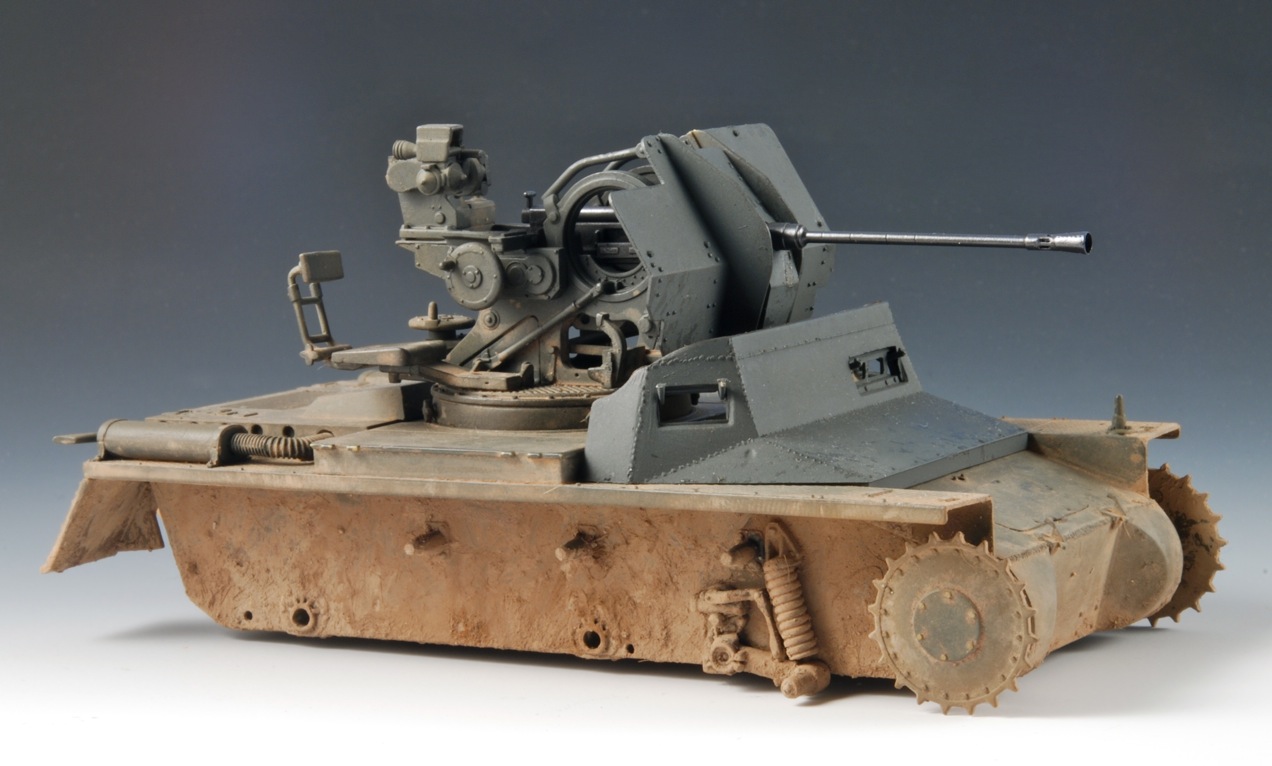
So my love affair with the Panzer I continues- this time I decided to crack the Tristar Panzer IA open, that details a variant incorporating a 2cm Flak 38 gun with a Panzer I/A chassis.
It uses the vintage and now OOP #35003, #35008 Panzer I/A kits as well as the discontinued FlaK38 kit, #35010.
While I was thinking of getting some aftermarket brass for this one I have been on a build out of the box kick for a bit and don't see why I should stop now- my philosophy to build a kit OOTB and see how it goes, learn the lay of the land and then maybe somewhere done the line do one with all the bells and whistles. Like this set from Voyager- albeit for the DML one.
Image
I really liked the Tristar take on Panzer I's - while Dragon's are in a way easier to build I think the Tristar ones have a more accurate look when it comes to the subtler details.


An online review is [url="http://www.perthmilitarymodelling.com/reviews/vehicles/tristar/tri35019.htm"][SIZE="4"][COLOR="RED"]HERE[/COLOR][/SIZE][/url]
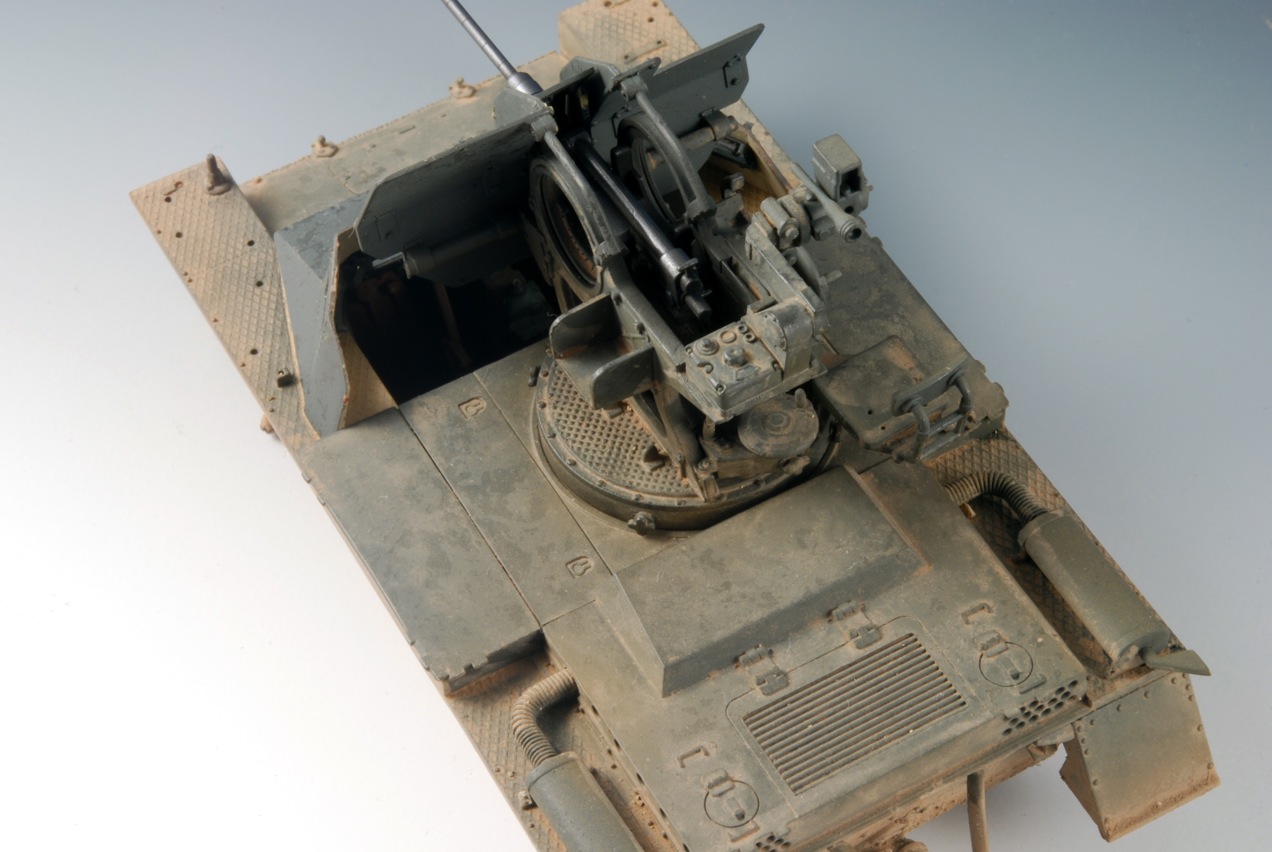
The first Step, a pleasant change from the usual dogma of road wheels road wheels and more road wheels, is about getting the Flak gun together
Some of the major parts
Image

One thing that I will upgrade will be the gun barrel as I have several sitting around, and I better use them!
Image

from the above I decided to use the least attractive first on this essentially OOTB so at least it'll get used and not just be a total waste of money:p
According to Terry Ashley at [url="http://www.perthmilitarymodelling.com/reviews/vehicles/flak38/flak38barrels.htm"][SIZE="4"][COLOR="green"]PMMS[/COLOR][/SIZE][/url] the Aber is pretty good but having a flaw in being a bit too long, making it, out of the ones I have, perhaps the best candidate for this upgrade. It will take more work because I have to make the barrel cone myself but I like a challenge, (sometimes):D
Here is the brass barrel next to the Tristar version.
Image

Image

Here I've managed in one go to get the cone right and soldered in place.
I only count seven large holes and I think there is meant to be 8? Oh well the only one's that will know it are you and me...:rolleyes: [SIZE="3"][COLOR="grey"]Somehow this was left out of Terry's review.[/COLOR][/SIZE] The fit is kinda weird for the larger holes- it doesn't quite line up right , but given what I have to work with I think I got the best result possible- Whoo ho!:thumb: I didn't bother with the removal of the 2mm length of the barrel, I just felt the chances for it f-ing up compared to how it looks the way it is precluded me from feeling the necessity to risk it.
Image

Image

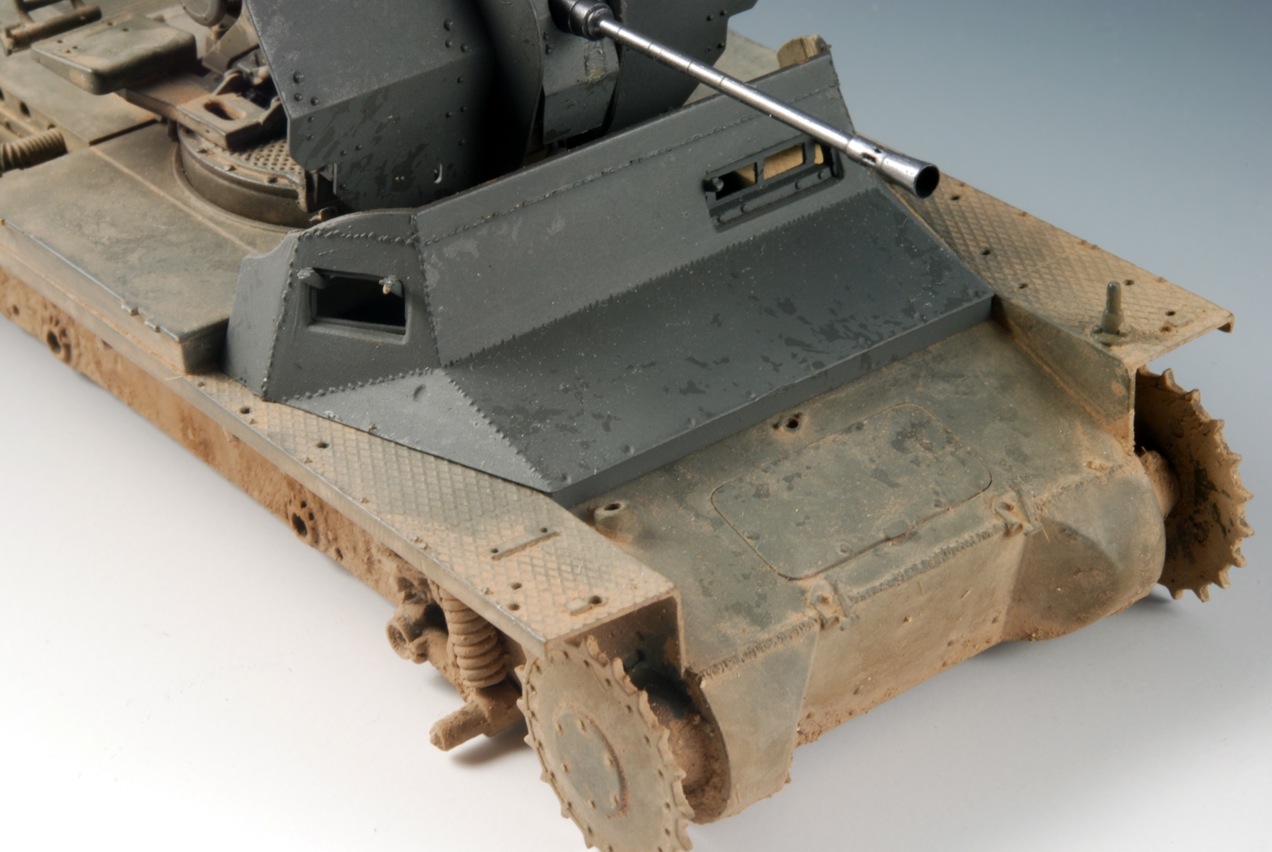
Here it is glued in place, after some major surgery on the original plastic part!, looking fairly nice if I do say so myself.
Image

Image

Image

The Tristar parts fit together very well and the engineering is really top notch-
Image

Image

Image

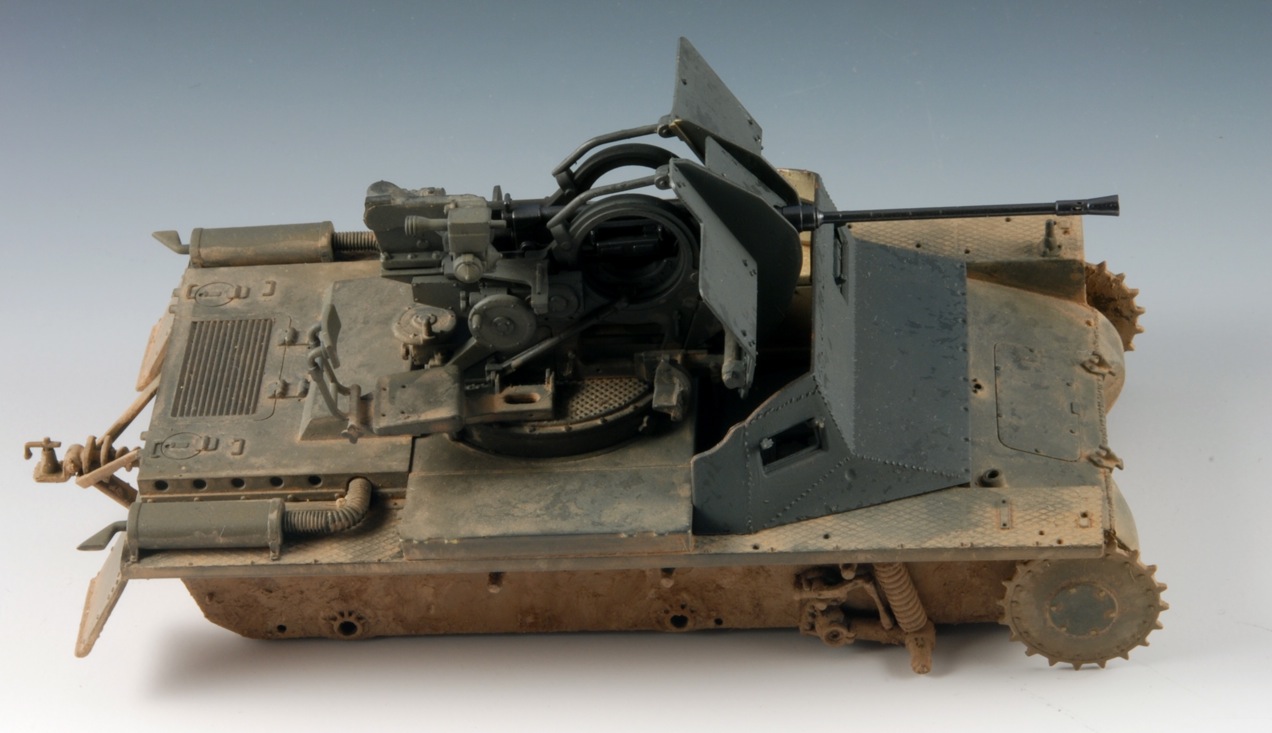
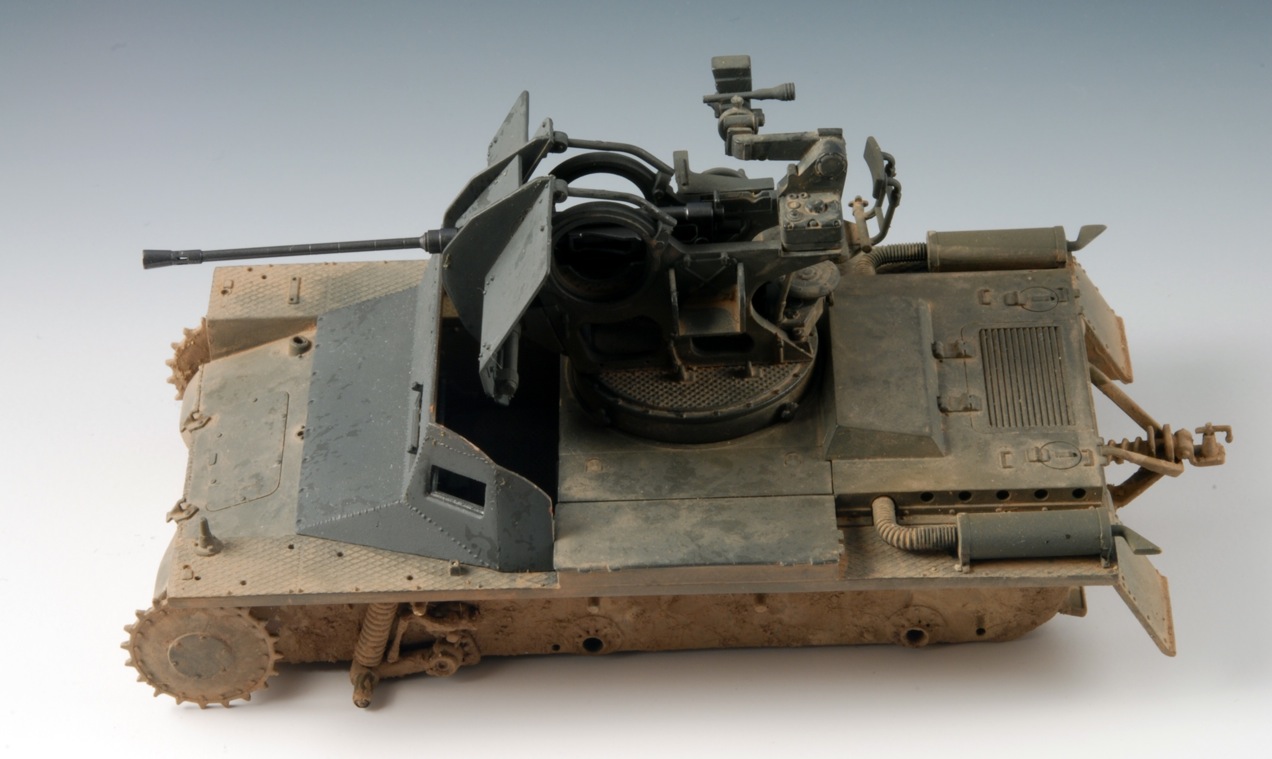
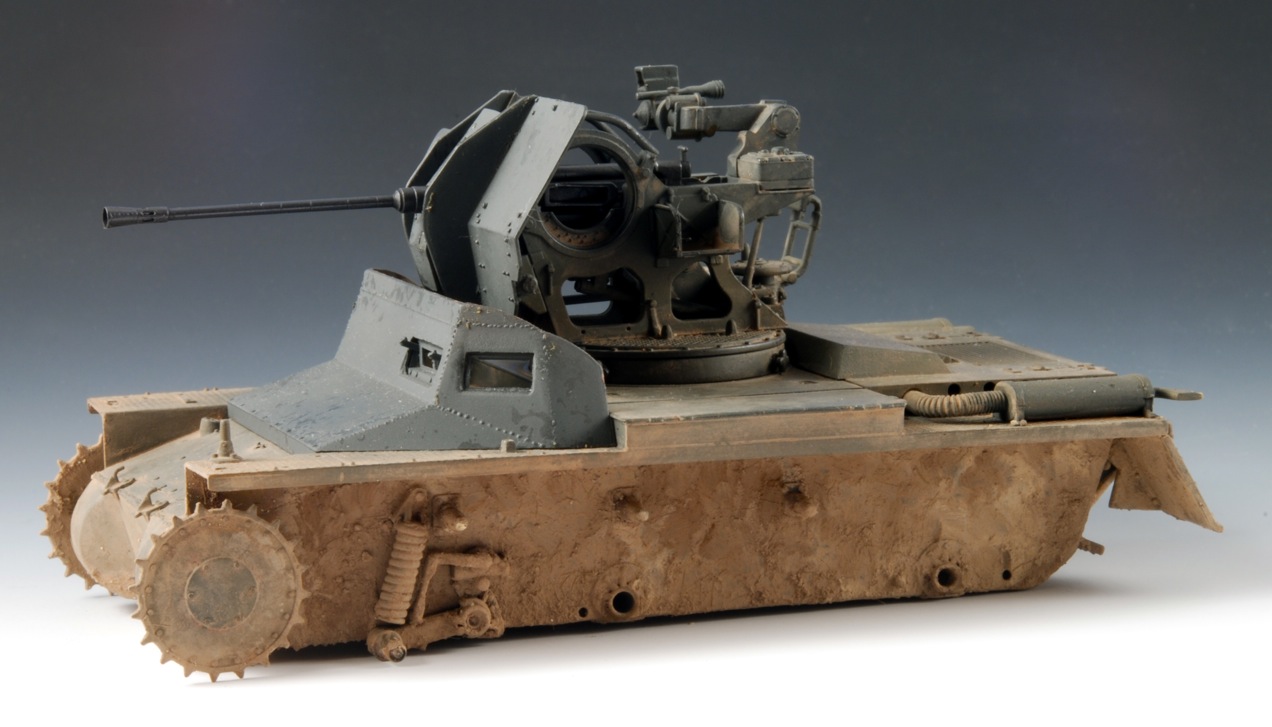
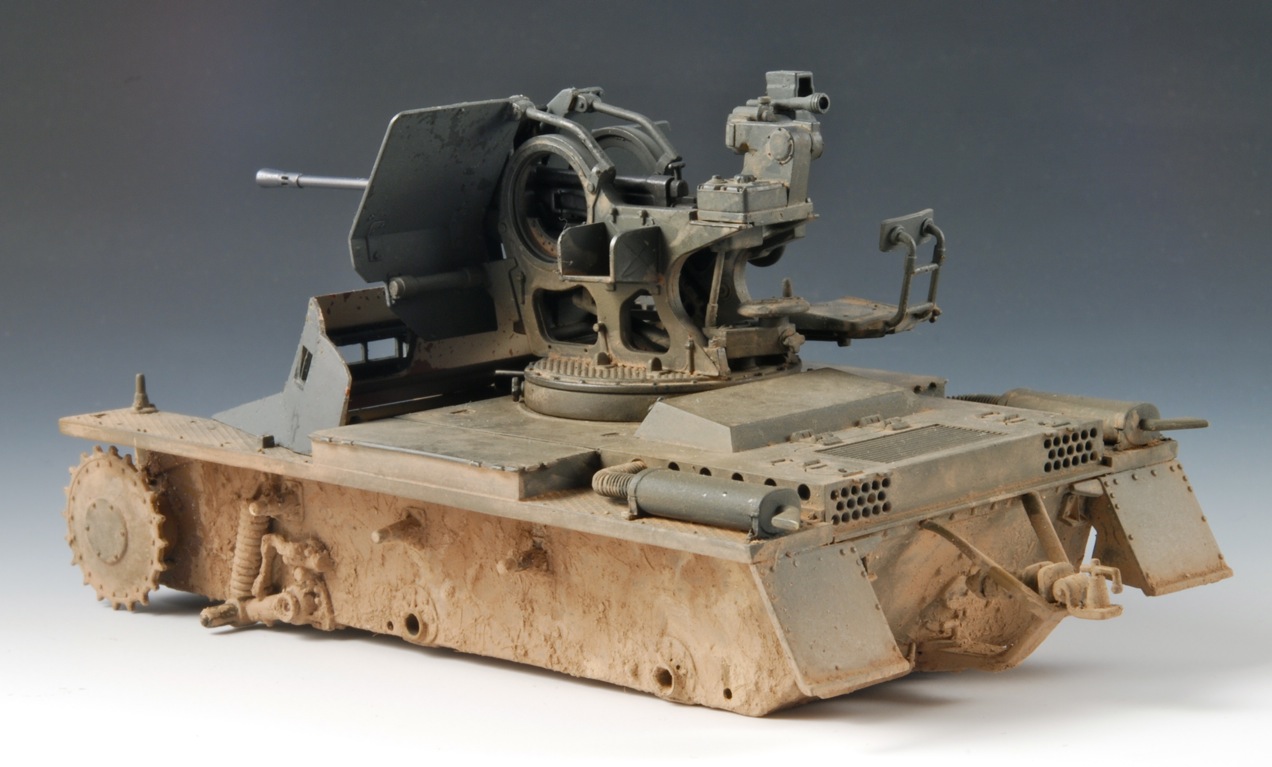
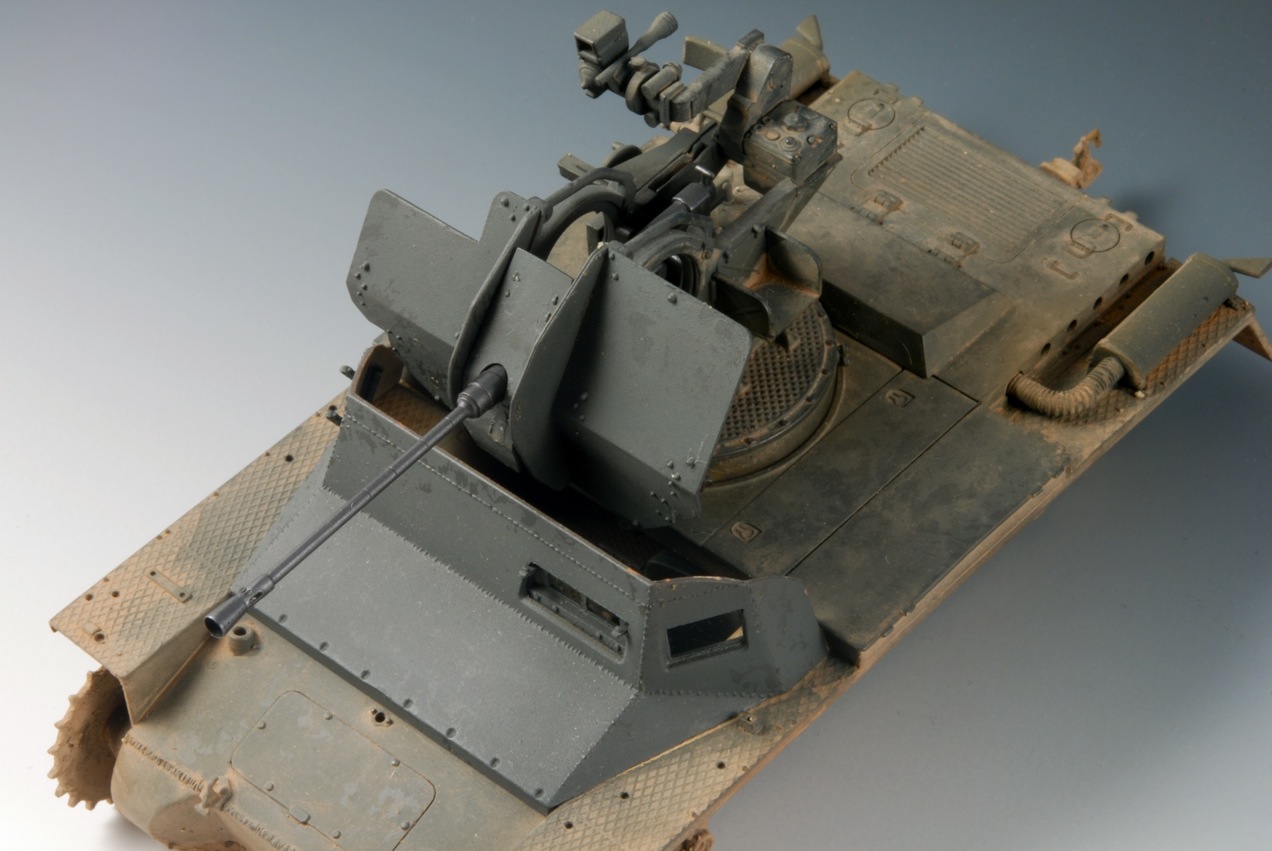
Thanks for the interest and pics. Here are some shots showing the progress.
Image

Image

Image

Image

Image

Image

Image

Image

Image

Image

Image

Image

Image

Some pics comparing the two manufacture's transmissions- the Tristar one is fairy intricate, the Dragon item nothing more than a sad caricature of the real thing.

Image

Image
"Don't believe everything you think"
User avatar
Jamie Tainton
Site Admin
 
Posts: 2094
Joined: Wed Aug 19, 2009 1:01 pm
Location: Vancover BC Canada

Re: Tristar German Flak Panzer I Ausf.A

Postby Jamie Tainton » Wed Aug 26, 2009 1:19 am

The hull is of the slab type- that is you need to build it with flat pieces as opposed to a single piece tub like Dragon's. In itself not a big deal just more opportunity for things to go wrong.:o Care must be taken to insure everything is lined up and plumb. I decided to glued one side and then work the other stuff in before adding the other side. I must say the level of detail is great and the fit is tight. Almost too tight, the tolerances are marginal- you again should test fit and use as little glue as possible in case you need to rip it up and rearrange things.:rolleyes:
The axle (?) closest to the engine wall doesn't quite fit to the hubs on the sides, but a minor detail as it is hidden under the tread plate floor in any event.
Image

Image

Image

Image

Image

One feature that is really nice about the Tristar Panzer I's is the vision port parts are far more accurate and to scale, check it out.
Image

Gluing on the fenders and engine deck
Image

Image

First lick of paint- some interior white-ish colour, Humbrol enamel #122
Image

Taped everything off to paint primer red. I had to divert from my usual process of painting everything separately and then gluing them in place because everything on the Tristar fits so tight and I also wanted to insure good bonds and have a clean build. Unfortunately the floor and engine back wall didn't seem to go together as tight a maybe they should? although it seems as though I had everything lined up. The transmission and steering brake assembly was a little too forward in the end by a millimeter and I had to do some fancy shoe horning and had to trim the two lower prongs on the transmission to get things to line up. Maybe 15%of this stuff will be seen after completion so it's not a huge deal - and you can't really notice anyways.
Image

Image

Prepping for the green-grey- I also did a little scouring pad/stop out technique for chips.
Image

Voila!
Image

I've been chipping away at this one lately- got the interior done then glued the upper structure in place. I managed to get a good coat of Extracolor dark grey on. Nice and dark and no blue. This pic is a bit over exposed so it's kinda light looking here.
Image

Image

Image

Image

Image

Image

Image

Image

This was a base for the chipping effect I wanted to try out to simulate wear on the dark grey. I like using stop out as it is more like a real chip than painting chips, as the first layer of paint is lower than the second, unlike when you paint chips on, sometimes it looks like they are sitting on top.- I used some Vallejo stop out applied with a scourging pad.
A lightened version of the dark grey is applied mainly from above the model to simulate some shading effect.
Image

I did a lot but much will disappear in subsequent layers of aging.
Image

Image

Removed the stop-out.
Image

overexposed-sorry
Image

Image

Image

Image

these are better
Image

Image

Just dry fit
Image

Image

Here's a bit of music for ya
[url="https://panzerfaust.netfirms.com/planetArmor/PanzerI%20Flak/general/05%20Wondering.mp3"]Wondering[/url]
BTW any one able to point me to a good figure set for this vehicle. I wanted to include figure driving this unit but after building up the driver that comes with Tristar's trainer version of the Panzer I/A I figured out that the guys would not have been having the Panzer type uniform depicted in the Tristar figure- back to the drawing board... Any suggestions- I mean to tweak any figure - just want a good place to start.
Here's what I made with a Hornet head and a DML hat + the Tristar fig.
I'll use it somewhere else I guess. Maybe the Bison I?:D
Image

Image

Image

Image

Here is a pic of the vehicle and the guys manning it. Also a reference to the type of uniform these guys would have had.
Image

Image

Image
"Don't believe everything you think"
User avatar
Jamie Tainton
Site Admin
 
Posts: 2094
Joined: Wed Aug 19, 2009 1:01 pm
Location: Vancover BC Canada

Re: Tristar German Flak Panzer I Ausf.A

Postby Jamie Tainton » Sun Aug 30, 2009 5:05 pm

Here I decided to take care of some of the lower chassis weathering using glue, scenic mud, flocking, and some pigments.I did it before adding the wheels to ensure that the areas behind the wheel supports got an authentic looking complete coverage. I also took it up a onto the upper structures a tad too. Since these pics I have reduced the amount up top using a water soaked brush to thin it out.
Image

Image

Image

Image

Image

Image

Image

Image
"Don't believe everything you think"
User avatar
Jamie Tainton
Site Admin
 
Posts: 2094
Joined: Wed Aug 19, 2009 1:01 pm
Location: Vancover BC Canada

Re: Tristar German Flak Panzer I Ausf.A

Postby Jamie Tainton » Sat Sep 05, 2009 1:37 pm

Here are some more progress shots show the trailer and it's initial weathering.
Image

Image

The tiny return rollers are really detailed with two pieces of PE for the center.
Image

Image

Ammo bits and pieces.
Image

Finally decided to get the road wheels on...
Image

Image

primed out in a Humbrol primer colour #78- and as you can see some of the stop out stuff has been applied.
Image

Here the trailer top has had the stop out removed and looks pretty good. I damaged the plastic handles in the process of removing the rubber but these can be easily replaced with wire.
Image

Strengthening Bar added.
Image

group shot
Image

Image

The Tristar tracks look really nice but - very labour intensive prepping them for use.
Image

So since I don't want to spend to much time on that and want to get this model finished before too long, I opted for a set of extra DML Magic tracks that came from a Panzerjager project.. Nice.
Image

First thing is to make the bottom length first.
Image

Image
"Don't believe everything you think"
User avatar
Jamie Tainton
Site Admin
 
Posts: 2094
Joined: Wed Aug 19, 2009 1:01 pm
Location: Vancover BC Canada

Re: Tristar German Flak Panzer I Ausf.A

Postby Jamie Tainton » Thu Sep 10, 2009 9:55 am

So next up I need to complete the tracks. After completing the bottom length of track I needed to make the top section. This was only long enough to come down a 1/4 of the circumference of both the sprocket wheel and the idler. These were capped off with two smaller sections that are made to curve around the wheels mentioned then to join with the upper and bottom section. The lengths are allowed to have the liquid cement set u some what prior to positioning, strong enough for them not to fall apart but flexible enough to be malleable.
Image

one side successfully completed.
Image

Image

Other side done.
Image

Image

Applied the decals.
Image

this is the vehicle I'm doing.
Image

Image

here I've given them a coat of paint mixed up from a dark metallic and and earth colour. (Humbrol)
Image

The orange thing is a cut piece off of a ear dam that I use for shaping the track sag- it helps keep things in place.
Image

Here the ammo cases and spare barrel boxes get some paint. I used different colours for some variety. There was some Vallejo stop out added prior to this that once rubbed off will give the chipping effect.
Image

Here the two pe pieces that cover the mufflers are annealed and shaped prior to painting and placement. It's hard to see but the mufflers have been coated with part one of a two part oxidizing paint technique.
Image

the sprocket and high points of the tracks recieve some metallic colour to show wear and use. The tracks also received some pigments to dirty them down a littl.
Image

Image

Image
"Don't believe everything you think"
User avatar
Jamie Tainton
Site Admin
 
Posts: 2094
Joined: Wed Aug 19, 2009 1:01 pm
Location: Vancover BC Canada

Re: Tristar German Flak Panzer I Ausf.A

Postby Jamie Tainton » Sun Sep 13, 2009 11:23 am

Well this one is nearing completion. I've attached the front armour shielding and took care of the muffler protective screens. These were annealed prior to curving to shape and then painted with the same grey as the rest of the kit. Over this various dark and light shades of Humbrol paint were applied for imparting the rust look.
Image

Image

Image

Image

Image

Image

Image
Base coated the wood handles on some of the tools that will be cemented onto the fender after they are painted.
Image

The vison port covers get the interior colour added before I can install them.
Image
"Don't believe everything you think"
User avatar
Jamie Tainton
Site Admin
 
Posts: 2094
Joined: Wed Aug 19, 2009 1:01 pm
Location: Vancover BC Canada

Re: Tristar German Flak Panzer I Ausf.A

Postby Tony Lee Watts » Sun Sep 13, 2009 12:14 pm

Nice progress man. Those are great little machines. 8-)

Tony the Mutt
Shoot Low Boys
They're Ridin Ponies
Tony Lee Watts
 
Posts: 177
Joined: Thu Aug 20, 2009 6:15 pm
Location: South West Missouri USA

Re: Tristar German Flak Panzer I Ausf.A

Postby Jamie Tainton » Mon Sep 14, 2009 1:03 pm

Thanks Tony. :)
"Don't believe everything you think"
User avatar
Jamie Tainton
Site Admin
 
Posts: 2094
Joined: Wed Aug 19, 2009 1:01 pm
Location: Vancover BC Canada

Re: Tristar German Flak Panzer I Ausf.A

Postby Jamie Tainton » Sat Oct 31, 2009 5:47 pm

I finally found some time to take some pics of the progress made on the model a couple of months ago! I have been busy working on the movie The A-Team and have not touched plastic for two months or so! But here is were the Tristar Flakpanzer I/A stands. The outer side boards have been glued in place. Looks pretty compact yet tough :twisted:

P.S. if the pics seem cut off you have to make your window larger.

Image

Image

Image

Image
"Don't believe everything you think"
User avatar
Jamie Tainton
Site Admin
 
Posts: 2094
Joined: Wed Aug 19, 2009 1:01 pm
Location: Vancover BC Canada

Re: Tristar German Flak Panzer I Ausf.A

Postby Dan Reed » Mon Dec 21, 2009 8:35 pm

Love to see a crew for these flakpanzer I's. Looking great here.
Dan
Dan Reed
 
Posts: 271
Joined: Sun Dec 20, 2009 10:54 pm
Location: Buffalo, MN

Next

Return to Panzerkampfwagen I and variants

Who is online

Users browsing this forum: No registered users and 1 guest

cron